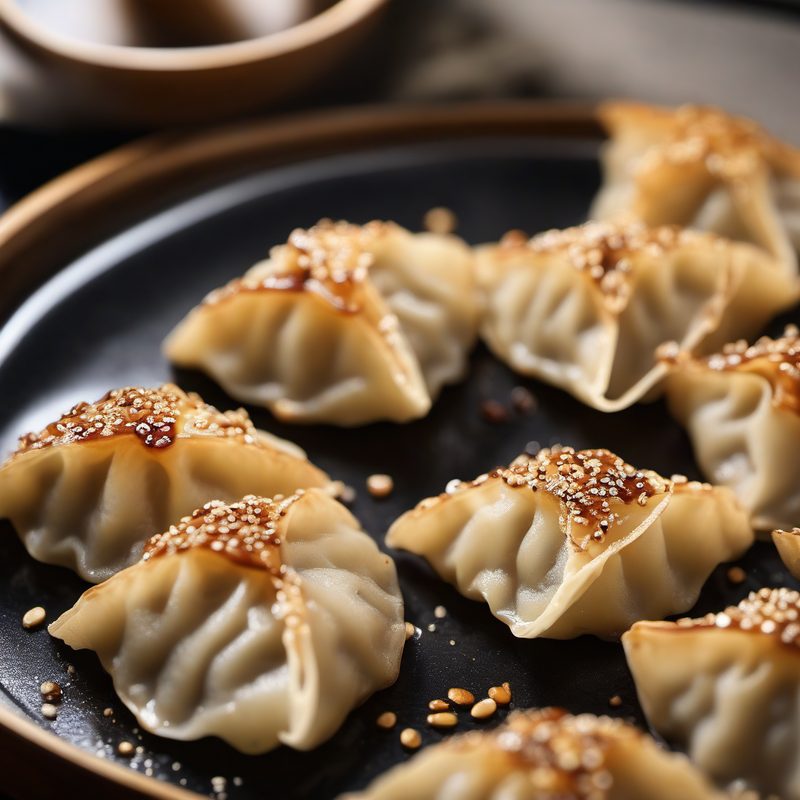
Gyoza Pork Dumplings
Crisp-bottomed, tender-skinned Japanese pan-fried dumplings packed with a savory pork and napa cabbage filling — golden and lacy on one side, juicy and aromatic within.
| Amount | Ingredient |
|---|---|
| 3 tbsp | Soy sauce |
| 2 tbsp | Rice vinegar (unseasoned) |
| 1 tbsp | Chili oil (la-yu or homemade) |
| 1 tsp | Toasted sesame oil |
| 1 tbsp | Finely chopped scallion (green part) |
These are the gyoza you crave from your favorite ramen shop: a delicate, hand-pleated wrapper that's pan-fried to a deep, crackling golden crust on the bottom, steamed to tender perfection, and filled with a juicy mixture of ground pork, finely chopped napa cabbage, scallions, and ginger. The secret is in the three-stage cooking process — fry, steam, then fry again — which delivers a dumpling that's shatteringly crisp on the bottom, silky-soft on top, and bursting with savory juices in every bite. A drizzle of soy-vinegar dipping sauce with a slick of chili oil is all you need to complete the experience. Make a batch on the weekend and freeze the extras for weeknight dumpling emergencies.
For the Filling
For the Dough (or substitute: 28 square or round gyoza wrappers)
For Cooking
For the Dipping Sauce
All produce is medium size unless specified. Use standard US measuring cups and spoons.
🥘 Equipment
- Large mixing bowl
- Box grater or Microplane
- Chef's knife and cutting board
- Small bowl (for cabbage draining)
- Clean kitchen towel or cheesecloth
- Rolling pin (if making dough from scratch)
- 3-inch (7.5 cm) round cutter (if making dough from scratch)
- Baking sheet lined with parchment paper (for assembled gyoza)
- Small bowl of water (for sealing wrappers)
- Large nonstick skillet with lid (12-inch, preferably with a tight-fitting lid)
- Thin metal spatula or offset spatula
- Small serving dish (for dipping sauce)
- Pastry brush (optional, for removing excess flour)
📋 Preparation
Step 1 — Prepare the Cabbage
Place the finely chopped napa cabbage in a medium bowl and toss with 1 teaspoon kosher salt. Let stand for 15 minutes. The salt draws out excess moisture — this is the single most important step for preventing waterlogged, soggy gyoza.
After 15 minutes, transfer the cabbage to the center of a clean kitchen towel or a double layer of cheesecloth. Gather the corners and twist firmly over the sink, squeezing out as much liquid as possible. You should be left with a dry, compact ball of cabbage.
Squeeze hard — really hard. Wet cabbage releases liquid during cooking that turns the filling into mush and can cause the wrappers to tear. The drier the cabbage, the juicier the finished gyoza.
Step 2 — Make the Filling
In a large bowl, combine the dried cabbage, ground pork, chopped scallions, grated ginger, Shaoxing rice wine, water, sesame oil, soy sauce, and white pepper.
Using your hands, mix vigorously in one direction (clockwise or counterclockwise) for about 2 minutes until the mixture is cohesive, slightly tacky, and all ingredients are evenly distributed. The mixture should look homogenous and feel springy when pressed.
Cover the bowl with plastic wrap and refrigerate for at least 1 hour (or up to overnight). This resting time allows the flavors to meld and makes the filling easier to work with.
The hand-mixing direction matters — stirring in one direction aligns the protein fibers, which helps the filling hold together and gives it a pleasant, slightly bouncy texture when cooked. If the filling feels too wet after mixing, add 1 tablespoon of flour or panko to tighten it.
Step 3 — Make the Dough (or Use Store-Bought Wrappers)
If making from scratch: In a large bowl, whisk together the flour and salt. Add the warm water and stir with a wooden spoon or chopsticks until a shaggy dough forms. Turn out onto a lightly floured surface and knead for 8 to 10 minutes until the dough is smooth, elastic, and springs back when pressed with a finger.
Wrap the dough in plastic wrap and let rest at room temperature for 30 minutes. This relaxes the gluten, making the dough easy to roll without snapping back.
After resting, divide the dough in half. Roll one half into a log about 1 inch (2.5 cm) in diameter, then cut into 14 equal pieces (about ⅓ oz / 10 g each). Keep the pieces covered with a damp towel to prevent drying. Repeat with the second half.
Roll each piece into a thin, 3-inch (7.5 cm) circle about 1/16 inch (2 mm) thick. The centers should be slightly thicker than the edges — this prevents the bottoms from tearing during cooking.
If using store-bought round gyoza wrappers, skip the dough-making step entirely. You'll need about 28 wrappers. Keep them under a damp paper towel so they don't dry out while you work.
Step 4 — Assemble the Gyoza
Line a baking sheet with parchment paper.
Working with one wrapper at a time (keep the rest covered), place about 1 heaping teaspoon (15 g) of filling in the center of the wrapper. Do not overfill — too much filling makes the gyoza impossible to seal and causes them to burst open during cooking.
Dip your finger in the small bowl of water and moisten the edges of the wrapper. Fold the wrapper in half over the filling to create a half-moon shape. Press the edges together in the center to seal, leaving the two open ends.
To create the signature pleats: Starting from the center seal, fold and press 4 to 5 small pleats along one edge, pressing each pleat firmly against the flat side. The dumpling should curve slightly into a crescent shape. Press the edges one final time all the way across to ensure a tight seal.
Place the finished gyoza on the parchment-lined baking sheet, seam-side up or flat-side down — either is fine as long as they aren't touching. Repeat with the remaining wrappers and filling.
If the wrapper edges dry out before you finish pleating, re-moisten with a dab of water. If they're too wet, dust your fingers with a little flour. The seal is everything — a leaky gyoza gives you a sad, empty pocket floating in the pan.
Step 5 — Cook the Gyoza
Heat 1 tablespoon of vegetable oil in a large nonstick skillet over medium-high heat until shimmering. Arrange the gyoza in the skillet in a single layer, flat-side down, spacing them about ½ inch apart — do not overcrowd. Cook without moving for 2 to 3 minutes until the bottoms are deep golden brown and crisp.
Peek under one gyoza with a thin spatula to check the color. You're looking for a uniform, golden-brown crust — like the bottom of a well-made biscuit. If some spots are pale, leave them; the pan surface is uneven and they'll even out during steaming.
Carefully add ½ cup of water to the skillet — it will splatter and hiss aggressively. Immediately cover with a tight-fitting lid and reduce the heat to medium-low. Steam for 5 to 6 minutes until the wrappers are translucent and the filling is cooked through (internal temperature of 165°F / 74°C).
Remove the lid and increase the heat to medium-high. Cook for 1 to 2 minutes more to re-crisp the bottoms and evaporate any remaining water. The bottoms should be audibly crisp — you'll hear a gentle crackle when you slide the spatula under them.
For the next batch: Wipe the skillet clean with a paper towel, add the remaining 1 tablespoon of oil, and repeat the process.
Step 6 — Make the Dipping Sauce
While the gyoza cook, whisk together the soy sauce, rice vinegar, chili oil, sesame oil, and chopped scallion in a small serving bowl. The sauce is best made fresh but can sit at room temperature for up to 2 hours.
Step 7 — Serve
Arrange the gyoza on a serving plate, crisp-bottom-side up, with the dipping sauce alongside. Serve immediately — gyoza lose their crunch within minutes as steam trapped beneath the wrapper softens the bottom.
To serve a dramatic platter: arrange the gyoza in a tight spiral or overlapping rows, with the golden crusts facing upward for maximum visual impact. A sprinkle of toasted sesame seeds and a few thin-sliced scallion rings on top adds a professional touch.
🧑🍳 Chef's Tips
- Dry the cabbage relentlessly. This is non-negotiable. Napa cabbage is very high in water, and if you don't squeeze it thoroughly, your gyoza filling will turn into a watery mess. Salt it first, wait 15 minutes, then wring it out in a towel like you're punishing it.
- Keep wrappers covered at all times. Gyoza wrappers (especially homemade ones) dry out in seconds. Work under a damp towel and only expose one wrapper at a time. Dried-out wrappers crack when you pleat them and won't seal properly.
- Don't overfill. A heaping teaspoon is plenty. Overstuffed gyoza are impossible to seal neatly, burst during cooking, and the filling-to-wrapper ratio goes off. You want each dumpling to be about 60% wrapper and 40% filling by volume.
- Chill the filling before assembling. A cold, firm filling is much easier to portion and shape than a warm, soft one. If the filling gets sticky as you work, pop the bowl back in the fridge for 10 minutes.
- A nonstick skillet is your best friend. Gyoza bottoms fuse aggressively to stainless steel or cast iron. Nonstick ensures that the delicate golden crust comes off in one clean piece every time. If you must use another pan, be generous with the oil and use a metal spatula.
- Let the pan reheat between batches. Wipe the skillet clean and add fresh oil for each batch. If you add gyoza to a pan with leftover browned bits, they'll stick and the oil temperature will be too low for proper browning.
❌ Common Mistakes
| Mistake | Why It Hurts | The Fix |
|---|---|---|
| Not salting and squeezing the cabbage | Excess water leaks into the filling during cooking, making the gyoza soggy and causing wrappers to tear | Always salt the cabbage, let it sit for 15 minutes, then squeeze it bone-dry in a kitchen towel |
| Overfilling the wrappers | Gyoza burst during cooking; filling leaks into the pan; wrappers don't seal | Use exactly 1 heaping teaspoon (15 g) of filling per gyoza |
| Sealing with dry edges | Pleats won't stick; gyoza open during steaming; filling spills into the pan | Moisten edges with water just before sealing; rewet if they dry out |
| Crowding the pan | Gyoza steam each other instead of browning; they stick together when you try to separate them | Leave at least ½ inch between each gyoza; cook in batches if necessary |
| Lifting the lid during steaming | Steam escapes; cook time extends; wrappers may not fully cook through | Keep the lid on for the full 5-6 minute steam — no peeking |
| Cooking at too-low heat for the fry stage | The bottoms turn pale and soft instead of golden and crisp | Medium-high heat, and don't move the gyoza for 2-3 minutes — let that crust form |
💡 Variations
| Variation | How To |
|---|---|
| Chicken Gyoza | Substitute ground chicken (preferably thighs) for the pork. Add 1 teaspoon grated garlic and 1 extra tablespoon of sesame oil, since chicken is leaner and needs more fat and flavor. |
| Shrimp Gyoza | Replace half the pork (8 oz) with 8 oz raw shrimp, peeled, deveined, and finely chopped. Do not puree — you want small shrimp bits for texture. Reduce water in the filling to 1 tablespoon. |
| Vegetable Gyoza | Omit the meat entirely. Use 12 oz extra-firm tofu, crumbled, plus 4 oz finely chopped shiitake mushrooms, and an extra ½ cup finely chopped napa cabbage. Add 1 tablespoon miso paste for umami depth. |
| Spicy Gyoza | Add 1 tablespoon gochujang (Korean chili paste) or 2 teaspoons sambal oelek to the filling. Swirl an extra teaspoon of chili oil into the dipping sauce. |
| Garlic-Ginger Gyoza | Double the ginger and add 2 cloves grated garlic to the filling for a punchier, more aromatic dumpling. |
| Sesame-Crusted Gyoza | After placing the gyoza in the pan, sprinkle 1 teaspoon toasted white sesame seeds over the bottoms before the oil fry. The seeds embed in the crust for extra nuttiness and crunch. |
| Soup Gyoza | Add 2 teaspoons of gelatinous unsalted chicken stock (or 1 teaspoon of gelatin dissolved in 2 teaspoons hot water, then chilled) to the filling. The gelatin melts during cooking, creating a soupy, xiao long bao–like interior. |
| Baked Gyoza | Brush assembled gyoza with oil and bake at 400°F (200°C) on a parchment-lined baking sheet for 12-15 minutes, flipping halfway. They won't have the signature crisp bottom, but they're a decent hands-off alternative. |
❄️ Storage
| Method | Details |
|---|---|
| Uncooked (Refrigerator) | Arrange uncooked gyoza in a single layer on a parchment-lined baking sheet, cover tightly with plastic wrap, and refrigerate for up to 4 hours. Cook directly from chilled, adding 30 seconds to the steam time. |
| Uncooked (Freezer) | Freeze uncooked gyoza on the parchment-lined baking sheet until solid (about 2 hours), then transfer to a zipper-lock freezer bag. Do not thaw — cook directly from frozen. Add 2-3 minutes to the total cook time (fry 3 minutes, steam 7 minutes, re-crisp 2 minutes). Gyoza keep for up to 3 months in the freezer. |
| Cooked (Reheating) | Reheat in a nonstick skillet over medium-low heat with a splash of water, covered, for 3-4 minutes. Uncover and cook 1 minute to re-crisp the bottoms. Do not microwave — the wrappers turn rubbery. |
🍷 Wine Pairing
- Riesling (Mosel, off-dry or Kabinett) — The gentle sweetness balances the salty-savory soy and pork, while the high acidity cuts through the pan-fried richness. A classic dumpling partner.
- Grüner Veltliner (Wachau, Federspiel) — White pepper, green apple, and a touch of lentil-like earthiness mirror the ginger and scallion notes. The bright acidity keeps each bite feeling fresh.
- Beaujolais (Cru, e.g., Fleurie or Chiroubles) — Light-bodied, fruity, with low tannins and a subtle earthiness. The red fruit complements the pork without overwhelming the delicate ginger-soy flavors.
- Prosecco (Valdobbiadene, extra dry) — Bubbles and moderate sweetness act as a palate cleanser between gyoza. The effervescence lifts the sesame oil richness beautifully.
- Chardonnay (Chablis, Premier Cru) — Lean, mineral-driven, unoaked. The flinty character and green apple acidity stand up to the pan-fried crust without any oak clashing with the delicate filling.
🍺 Beer Pairing
- Japanese Rice Lager (Sapporo, Asahi Super Dry, or Kirin Ichiban) — Bone-dry, crisp, and highly carbonated — this is the canonical gyoza beer for a reason. It scrubs the palate clean between each dumpling.
- Czech Pilsner (Pilsner Urquell or similar) — Clean, moderately bitter, and lightly malty. The hop bitterness cuts through the oil; the soft malt cushions the savory pork.
- Hefeweizen (German wheat beer) — Banana and clove aromatics play off the ginger and scallion beautifully, while the creamy texture and high carbonation provide a refreshing contrast to the crisp-bottomed gyoza.
- Saison — Spicy, peppery, and dry with a funky yeast-driven character that mirrors the ginger and sesame flavors. The dry finish prevents palate fatigue.
📊 Nutrition (per serving of 7 gyoza)
| Calories | Protein | Fat | Carbs | Fiber |
|---|---|---|---|---|
| 380 | 22 g | 16 g | 36 g | 2 g |
Nutrition is an estimate based on standard ingredient quantities and assumes homemade dough wrappers. Values will vary with oil absorption and store-bought wrapper brands.
❓ Frequently Asked Questions
What's the difference between gyoza and potstickers?
Gyoza are the Japanese version of the Chinese potsticker (jiaozi). The differences are subtle: gyoza wrappers are thinner and slightly smaller, the filling typically includes garlic (less common in traditional potstickers), and gyoza are often served with a soy-vinegar-chili oil dipping sauce rather than black vinegar. The cooking method — fry, steam, fry — is essentially the same.
Can I use store-bought wrappers?
Absolutely. Store-bought round gyoza wrappers (found in the refrigerated section of most Asian grocery stores and many supermarkets) are excellent and save a lot of time. You'll need about 28 wrappers. Square wonton wrappers also work — just trim them into rounds with a 3-inch cutter, or fold them into a rectangular shape instead of a half-moon.
Why are my gyoza sticking to the pan?
Three possible reasons: (1) your pan isn't nonstick — use a nonstick skillet, (2) you didn't use enough oil — 1 tablespoon per batch is the minimum, or (3) the bottoms weren't fully crisped before you tried to move them. Let them cook undisturbed for a full 2-3 minutes during the first fry stage.
My gyoza burst open during cooking. What went wrong?
Likely one of three things: overfilling, a weak seal, or the filling was too wet. Use a heaping teaspoon of filling, moisten the edges thoroughly, press the pleats firmly, and make sure your cabbage was squeezed dry.
Can I make the filling ahead of time?
Yes, up to 24 hours in advance. The flavors actually improve after an overnight rest in the refrigerator. Just bring it back to room temperature for 15 minutes before assembling so it's pliable enough to work with.
My gyoza came out soggy, not crisp. Why?
The most common culprit is not letting the water fully evaporate during the final uncovered fry. After steaming, remove the lid and let the pan work its magic for a full 1-2 minutes over medium-high heat. You should hear a crackling sound as the water finishes evaporating and the bottoms re-crisp.
🔗 Related Recipes
- Fresh Ramen Noodles
- Chicken Nems (Vietnamese-Style)
- Mixed Paella
- Simple Pork Potstickers
- Soba Noodles with Soy-Sesame Dressing
🏷️ Search Tags
Photo reference: `vol1_35.png` — A warm-toned close-up of a ceramic plate piled high with golden-bottomed gyoza, arranged in a neat overlapping spiral. Steam rises softly from the dumplings. A small dipping bowl of soy-vinegar-chili sauce sits beside the plate, with scallion rings and toasted sesame seeds scattered over the gyoza. The background is a textured dark linen, letting the golden-brown crusts take center stage.
Recipe from "The Italian Kitchen" by Vita Milanese — Volume 1: Pasta Perfetto
Recipe from The Italian Kitchen by Vita Milanese — Volume 1 · Pasta Perfetto. Discover all volumes on the ebook page.