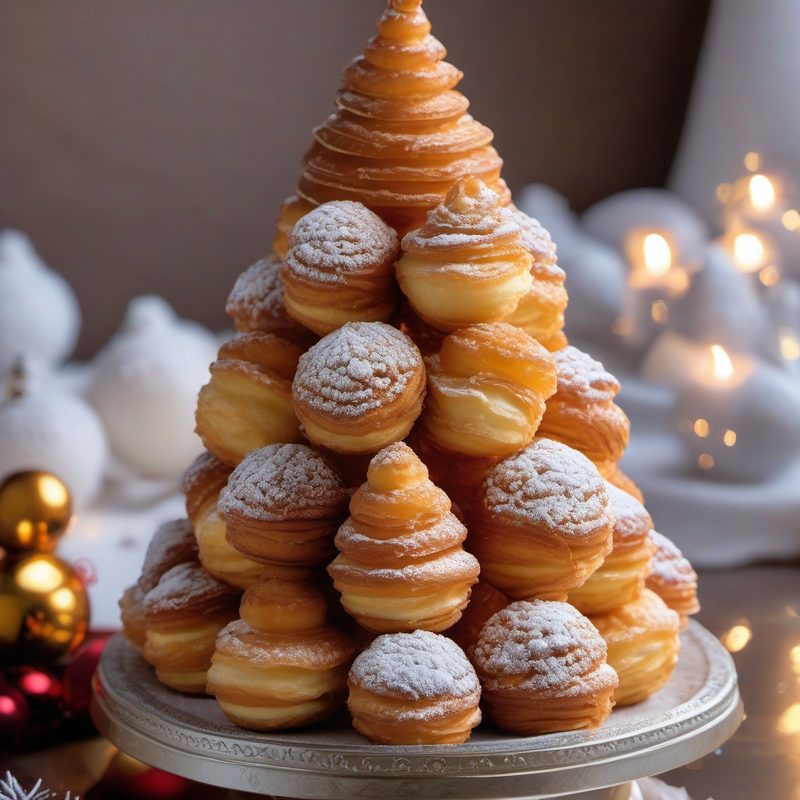
Christmas Croquembouche
A showstopping tower of caramel-glazed cream puffs filled with silky vanilla pastry cream and draped in ethereal spun-sugar threads — the ultimate French-Italian holiday centerpiece that transforms humble choux pastry into edible architecture.
| Amount | Ingredient |
|---|---|
| 1¼ cups (250 g) | Granulated sugar |
| 3½ tbsp (50 ml) | Water |
The croquembouche (literally "crunches in the mouth") is the grand dame of French pâtisserie, traditionally served at weddings and celebrations. This Christmas version — Croquembouche di Natale — brings the same dazzling technique to the holiday table, where a towering cone of caramel-dipped cream puffs doubles as both dessert and decoration. Each component is classic French technique: airy choux pastry, velvety crème pâtissière, and amber caramel that does double duty as both glue and garnish.
While the finished tower looks like it belongs in a Parisian pâtisserie window, the individual components are surprisingly approachable for the home cook. Choux pastry is one of the most forgiving doughs — it puffs in the oven with no yeast required. The pastry cream is a simple stovetop custard. And the assembly, while requiring patience, rewards you with a dessert that will draw gasps from every guest. The key is organization: have your cream puffs baked, your pastry cream chilled, and your caramel ready before you start stacking. With a paper cone as your scaffold, you're essentially building a delicious Christmas tree of pastry.
For the Choux Pastry
For the Vanilla Pastry Cream (Crème Pâtissière)
For the Caramel & Assembly
| As needed | Vegetable oil (for hands, optional) |
|---|
Use level tablespoons and standard US measuring cups. All produce is medium unless specified.
🥘 Equipment
- Large saucepan (2- to 3-quart)
- Medium saucepan (for caramel)
- Mixing bowls (small, medium, large)
- Whisk
- Rubber spatula
- Wooden spoon
- Stand mixer with paddle attachment (or hand mixer + strong arm)
- Piping bags (2), one with ½-inch (1 cm) plain round tip, one with small plain tip for filling
- 2 large baking sheets
- Parchment paper
- Fine-mesh sieve
- Plastic wrap
- Pastry brush
- Small offset spatula
- Paper cone former: 1 sheet A5 cardstock (or 8×5-inch paper), tape, scissors
- 2 identical small bowls (for spun sugar)
- 2 wooden spoons (for spun sugar)
- Kitchen blowtorch (optional, for reheating caramel)
- Candy thermometer (helpful but not required)
- Wire rack
- Serving platter or cake stand
- Fork or small skewer
- Heatproof bowl of cold water (for pooling caramel drips)
📋 Preparation
Part 1: Make the Choux Pastry (20 minutes + 30 minutes baking + 30 minutes drying)
A note on timing: The choux pastry and pastry cream can (and should) be made on the same day, as both need to cool completely before assembly. Start with the choux, then make the pastry cream while the puffs bake.
Step 1 — Make the panade
Place the butter cubes, water, sugar, and salt in a large saucepan. Set over medium heat and bring to a full rolling boil, stirring occasionally to help the butter melt evenly. The mixture must be at a vigorous boil before you add the flour — this is critical for proper puffing.
Step 2 — Add the flour
Remove the pan from the heat and pour in the sifted flour all at once. Stir vigorously with a wooden spoon — the mixture will look rough and floury at first, but keep stirring. Return the pan to medium-low heat and cook, stirring constantly, for 2 to 3 minutes. The dough will pull away from the sides of the pan and form a smooth ball, and a thin white film will appear on the bottom of the pan — this is the starch gelatinizing properly.
The white film on the pan bottom is your signal that the dough is sufficiently dried. Under-dried choux won't puff as well.
Step 3 — Cool and incorporate the eggs
Transfer the dough to the bowl of a stand mixer fitted with the paddle attachment. Beat on low speed for 2 to 3 minutes to cool the dough slightly. Wait until steam stops rising from the bowl before adding the eggs — if the dough is too hot, the eggs will scramble.
With the mixer on medium speed, add the beaten eggs one at a time, waiting until each addition is fully absorbed before adding the next (about 30 seconds between each). The dough will look curdled and slippery at first, then smooth out. After all the eggs are incorporated, the dough should be glossy, smooth, and thick enough to fall from the paddle in a slow, continuous ribbon — it should hold a V-shape when lifted and dropped.
The "V-shape test": Dip the paddle into the dough and lift it straight up. The dough should fall in a thick ribbon that holds a V-shape for a moment before sinking back in. If it's too stiff, beat in half a beaten egg; if too thin and runny, it's over-hydrated and won't puff properly.
Step 4 — Pipe the puffs
Preheat your oven to 425°F (220°C) with racks in the upper and lower thirds of the oven. Line two baking sheets with parchment paper.
Transfer the choux dough to a piping bag fitted with a ½-inch (1 cm) plain round tip. Pipe 30 evenly sized mounds onto the prepared baking sheets, about 1½ inches (4 cm) in diameter and 1 inch (2.5 cm) tall, spacing them at least 2 inches (5 cm) apart — 15 per sheet.
Dip a pastry brush in cold water and gently dab the top of each mound to flatten any peaks. This moisture helps create steam inside the oven and prevents the tips from burning.
Step 5 — Bake the puffs
Place both sheets in the oven and bake at 425°F (220°C) for 15 minutes. Do not open the oven door during this time. Reduce the temperature to 375°F (190°C) and bake for another 10 minutes. Turn the oven off, crack the door open with the handle of a wooden spoon, and let the puffs rest inside the oven for 30 minutes — this allows the interiors to dry out completely.
Why the long rest? Cream puffs need to be bone-dry inside to hold their structure when filled. If you skip this step, they'll collapse or turn soggy. The open door allows moisture to escape without shocking the shells with cold air.
Transfer the puffs to a wire rack and let cool completely.
Part 2: Make the Vanilla Pastry Cream (20 minutes + cooling)
Step 6 — Infuse the milk
Split the vanilla bean lengthwise with a paring knife and scrape the tiny black seeds into a medium saucepan. Add the scraped pod, milk, heavy cream, and half the sugar (½ cup / 105 g). Set over medium heat and bring to a gentle simmer — small bubbles around the edge, but not a full boil — about 4 to 5 minutes. The vanilla pod infuses the dairy while the seeds provide those beautiful specks.
Step 7 — Prepare the egg mixture
While the milk heats, whisk the egg yolks, remaining ½ cup (105 g) sugar, cornstarch, and salt together in a medium bowl until pale, thick, and smooth — about 1 minute. The mixture should fall from the whisk in a thick, continuous ribbon.
Step 8 — Temper and thicken
Slowly drizzle about 1 cup of the hot milk mixture into the egg yolk mixture while whisking constantly — this tempers the yolks so they don't scramble. Pour the tempered mixture back into the saucepan, whisking continuously. Return to medium heat and cook, whisking constantly and scraping the bottom and corners of the pan, until the cream thickens and one or two large bubbles burst on the surface — about 2 to 3 minutes after coming back to heat.
The cream is ready when it's thick enough to hold a whisk mark and slides off the whisk in a thick sheet. If you stop too early, the cream will be runny; cook 30 seconds past the first bubble to be safe.
Step 9 — Cool the cream
Remove from heat. Fish out the vanilla pod (rinse and save for vanilla sugar or another use). Scrape the pastry cream through a fine-mesh sieve into a clean bowl to remove any lumps. Press a sheet of plastic wrap directly onto the surface of the cream — this is non-negotiable; it prevents a skin from forming. Let cool to room temperature, about 30 minutes, then refrigerate until fully cold and firm, at least 2 hours (or up to 2 days).
Part 3: Make the Paper Cone Scaffold (10 minutes)
Step 10 — Form the cone
Take a sheet of A5 cardstock (or an 8½ × 5½ inch piece of stiff paper). Bring one corner toward the midpoint of the opposite long edge, folding the paper into a cone shape. Roll the remaining paper around the cone to complete the shape. Secure with tape along the seam.
Trim the bottom of the cone with scissors so it stands flat and level with a base diameter of about 4 inches (10 cm). Trim the top of the cone to a height of about 10 inches (25 cm).
Step 11 — Wrap and position
Wrap the cone completely in parchment paper, folding the parchment over the top opening and taping at the seam. Place the cone upright in the center of a parchment-lined serving platter or cake board. The scaffold must be stable — if it wobbles, the tower will lean.
Part 4: Fill the Cream Puffs (15 minutes)
Step 12 — Fill the puffs
Remove the chilled pastry cream from the refrigerator and whisk it briefly to loosen it to a pipeable consistency. Transfer to a piping bag fitted with a small plain tip (about ¼ inch / 6 mm).
Working with one puff at a time, gently poke the tip through the bottom of each cream puff and squeeze a generous amount of pastry cream into the interior. You'll feel the puff swell slightly as it fills. Set the filled puffs on a parchment-lined tray. Refrigerate the filled puffs while you prepare the caramel — cold puffs make for easier caramel dipping.
Part 5: Make the Caramel & Assemble the Tower (30 minutes)
Step 13 — Make the caramel
In a medium saucepan, combine the sugar and water. Stir gently with a fork to wet the sugar, then place over medium heat. Bring to a boil without stirring. Cook until the syrup turns a deep amber color — about 6 to 8 minutes depending on your stove. Watch carefully; caramel goes from perfect to burnt in seconds.
To test: Dip a fork into the caramel and lift it out — the caramel should be a rich honey-amber to light copper color. When it reaches the desired color, immediately remove the pan from heat and plunge the bottom into a heatproof bowl of cold water for 5 to 10 seconds to stop the cooking.
Safety first: Caramel reaches 340°F (170°C) — it's dangerously hot. Keep children and pets away, never touch the hot sugar, and if you get caramel on your skin, immediately run it under cold water, don't try to wipe it off.
Step 14 — Dip and stack
Working quickly (caramel starts to harden within minutes), take the filled puffs from the refrigerator. Dip the bottom half of each puff into the warm caramel, letting excess drip back into the pan. Press the caramel-coated side of the puff against the parchment-covered paper cone, starting at the base.
Layer 1 (bottom): Arrange 8 to 9 puffs in a ring around the base of the cone, pressing gently to adhere. The caramel acts as glue — each puff should touch its neighbors.
Layer 2: Arrange 7 to 8 puffs in a ring above the first, slightly offset (staggered like bricks) and reducing the diameter slightly.
Layer 3: 5 to 6 puffs.
Layer 4: 3 to 4 puffs.
Layer 5 (top): 3 puffs arranged in a tight triangle on the very top.
Finial: Dip one last puff generously in caramel and place it on top of the 3 puffs at the crown.
If the caramel hardens before you finish, reheat it gently over low heat, stirring occasionally, just until fluid again. You can also use a kitchen blowtorch to warm solidified caramel on individual puffs to help new ones stick.
Step 15 — Drizzle with caramel
Spoon or drizzle any remaining caramel over the assembled tower, letting it cascade down the sides in thin threads. Create a small pool of caramel at the very top around the finial puff.
Let the tower rest for 10 minutes to let the caramel fully set and harden.
Part 6: Make Spun-Sugar Threads (10 minutes)
Step 16 — Prepare the spinning station
Set up two identical small bowls about 20 inches (50 cm) apart. Lay two wooden spoons across the bowls, handles facing each other, with about 8 to 10 inches (20 to 25 cm) gap between the handles. Place a sheet of parchment paper underneath to catch drips.
Step 17 — Make the threads
Reheat the remaining caramel (or make a fresh batch if the first batch has hardened too much). The caramel is ready for spinning when it starts to thicken slightly and a dipped spoon forms thin, trailing threads — this happens as the caramel cools from 340°F down to about 280°F (140°C). Dip a fork or small whisk into the warm caramel and wave it back and forth over the wooden spoon handles, letting fine sugar threads fall and accumulate.
The trick to good spun sugar: the caramel must be warm enough to be fluid but cool enough to form threads. If it's too hot, it will just drip; too cold and it will be too thick. Test on the edge of the pan first — you should see thin, wispy threads, not thick glops.
Continue dipping and waving until you have a generous nest of fine golden threads draped over the wooden spoon handles.
Step 18 — Drape the threads
If the paper cone feels stable inside the tower, carefully remove it by pulling it straight up from the center. If the tower wobbles without it, leave the cone in place and transfer the entire assembly (with parchment and cone) to a serving plate.
Gently gather the spun-sugar nest in your hands (handle lightly — it's delicate and will shatter if squeezed) and drape it over and around the croquembouche, wrapping the threads loosely around the tower like edible holiday garland. Work from top to bottom, letting some threads cascade down the sides.
Spun sugar is extremely humidity-sensitive. It will begin to dissolve and collapse within 1 to 2 hours in any humidity above 50%. Assemble as close to serving time as possible.
Step 19 — Present and serve
Place the tower on a large serving platter or cake stand. Serve immediately — the croquembouche is best enjoyed within 2 hours of assembly. To serve, use two forks to gently pull apart individual cream puffs from the tower. Guests help themselves, each puff breaking away with its caramel coating intact.
🧑🍳 Chef's Tips
- Room temperature eggs for choux: While most pastry benefits from cold eggs, choux pastry incorporates better when the eggs are at room temperature. If your eggs are cold, place them in a bowl of warm water for 5 minutes before cracking.
- Drying is not optional: The 30-minute oven-drying rest with the door cracked is what gives cream puffs their crisp, hollow interior. Rushing this step leads to deflated, soggy puffs.
- Cold puffs, warm caramel: Filled puffs straight from the fridge help the caramel set on contact rather than running off. Keep them chilled until the last possible moment.
- Work in batches with caramel: Caramel has a narrow window of workability. If you're a slow assembler, make the caramel in two batches rather than trying to keep one batch fluid for too long.
- Humidity is the enemy: Spun sugar is fragile and moisture-sensitive. Do not attempt croquembouche on a rainy or very humid day — the caramel will soften and the tower may collapse.
- Stabilize the tower: If the tower feels wobbly during assembly, use a skewer or thin chopstick inserted through the center (alongside the paper cone) as extra structural support.
- Make ahead option: The cream puffs (unfilled) can be baked 2 days ahead and stored in an airtight container at room temperature. Fill and assemble the day of serving for best texture.
❌ Common Mistakes
| Mistake | Why It Hurts | The Fix |
|---|---|---|
| Choux puffs don't puff | Oven opened too early or dough was too wet | Never open the oven in the first 15 minutes; test the V-shape ribbon before piping |
| Pastry cream is lumpy | Eggs were scrambled by too-hot milk or cornstarch wasn't fully whisked | Temper slowly with a thin stream of hot milk; strain through a sieve |
| Caramel crystallizes (turns grainy/solid) | Sugar crystals on the pan sides or stirring during boiling | Wash down pan sides with a wet brush before boiling; never stir once boiling |
| Caramel burns | Cooked too long or heat too high | Watch for deep amber color; remove and shock in cold water immediately |
| Puffs slide off tower | Caramel not hot enough to adhere or puffs were too warm | Reheat caramel; chill filled puffs thoroughly before dipping |
| Spun sugar won't form threads | Caramel too hot (just drips) or too cold (too thick) | Let caramel cool slightly after boiling; test on a fork first |
| Tower collapses | Base layer too small or puffs not well adhered | Use 8-9 puffs in a stable base ring; press each puff firmly into caramel |
| Cream puffs are soggy | Filled too far ahead or not baked dry enough | Fill no more than 3 hours before serving; dry puffs 30 minutes in oven |
💡 Variations
- Chocolate croquembouche: Replace 3 tablespoons (20 g) of the flour in the choux with unsweetened cocoa powder. Add 4 oz (115 g) melted dark chocolate to the pastry cream after straining.
- Coffee cream: Steep 2 tablespoons finely ground espresso beans in the milk for 10 minutes before straining for a caffè-flavored pastry cream.
- Hazelnut croquembouche: Fold ½ cup (60 g) finely ground toasted hazelnuts into the choux dough along with the eggs. Replace 2 tablespoons of the cornstarch in the pastry cream with hazelnut praline paste.
- Pistachio version: Add ½ cup (65 g) finely ground pistachios to the choux flour. Fold ¼ cup (30 g) chopped pistachios into the pastry cream and garnish with more crushed pistachios.
- Individual mini towers: Skip the cone and create small 4- to 5-puff clusters on individual plates, drizzled with caramel and topped with a small spun-sugar garnish — perfect for a plated dessert.
- Gluten-free choux: Substitute the all-purpose flour with a high-quality gluten-free all-purpose flour blend that contains xanthan gum. The texture will be slightly less airy but still excellent.
❄️ Storage & Leftovers
| Method | Details |
|---|---|
| Room temperature | Best consumed within 2 hours of assembly. The spun sugar will begin to dissolve in humidity. |
| Refrigerator | Not recommended once assembled — the caramel softens and the pastry cream can weep. |
| Individual components | Unfilled choux puffs: 2 days airtight at room temp. Pastry cream: 2 days refrigerated, plastic wrap on surface. Caramel: can be re-melted from hardened state over low heat. |
| Freezer | Unfilled baked choux puffs can be frozen for up to 1 month. Thaw at room temperature, then re-crisp in a 300°F (150°C) oven for 5 minutes. Do not freeze filled puffs. |
| Reheating | Not applicable for the assembled tower. Leftover puffs can be eaten as-is or re-crisped briefly in the oven. |
🍷 Wine Pairing
| Wine | Why |
|---|---|
| Moscato d'Asti (sparkling white) | Low alcohol, peachy sweetness, and gentle bubbles — a classic that mirrors the vanilla and caramel notes |
| Prosecco Extra Dry (sparkling) | Crisp acidity cuts through the rich pastry cream and caramel |
| Champagne Demi-Sec (sparkling) | Off-dry Champagne — the king of celebratory wines for the king of celebratory desserts |
| Vin Santo (sweet white) | Nutty, honeyed Tuscan dessert wine — the caramel notes are a perfect match |
| Brachetto d'Acqui (sparkling red) | Lightly sweet, strawberry-scented bubbles that feel festive and Christmas-y |
| Passito di Pantelleria (sweet white) | Apricot, honey, and dried fruit notes echo the caramel's depth |
| Sauternes (sweet white) | Luxurious, honeyed richness that stands up to the caramel's intensity |
🥗 Suggested Accompaniments
- Fresh berries — raspberries, blackberries, or pomegranate seeds scattered around the base add color and acidity to balance the sweetness
- Unsweetened whipped cream — a bowl on the side for guests who want to dip their puffs
- Espresso or strong black coffee — bitter, dark, and essential for cutting through the caramel richness
- Crème anglaise — a pool of vanilla custard sauce on each plate turns the croquembouche into a plated dessert
- Fresh mint sprigs — for garnish and a breath of freshness
- Chestnut purée or mont blanc cream — a dollop alongside for an extra French-accented indulgence
- Sparkling water with lemon — a palate-cleansing non-alcoholic option between bites
📊 Nutrition (per serving, estimated — 2-3 cream puffs)
| Calories | Protein | Fat | Carbs | Fiber |
|---|---|---|---|---|
| 481 | 8 g | 19 g | 69 g | 1 g |
Nutrition is estimated and will vary based on specific brands and ingredient substitutions.
❓ Frequently Asked Questions
Can I use a different filling?
Absolutely. While vanilla pastry cream is classic, you can substitute lemon curd, chocolate mousse, whipped ganache, or even stabilized whipped cream. Just ensure whatever filling you use is firm enough to hold its shape at room temperature.
Can I make croquembouche ahead of time?
The components should be made ahead (choux puffs 2 days, pastry cream 2 days), but the final assembly — filling, dipping, stacking, and spun sugar — should happen the day of serving, ideally within 2 to 3 hours of serving time.
What if I don't have a piping bag?
For choux pastry, use a sturdy zip-top bag with a corner snipped off. For filling, use a smaller zip-top bag with a very small hole. The results won't be as neat but will work perfectly fine.
How do I keep the caramel from crystallizing?
Two rules: (1) wash down the sides of the pan with a wet pastry brush just after the sugar starts to boil — this dissolves any stray sugar crystals; and (2) never stir the caramel once it's boiling. A squeeze of lemon juice or a teaspoon of corn syrup added at the start also helps prevent crystallization.
Can I use a foam cone instead of a paper cone?
Yes — a clean, food-safe Styrofoam cone can be used as the scaffold instead of the paper cone. Wrap it tightly in plastic wrap and then parchment paper before stacking. This is actually easier and more stable.
Why did my choux pastry turn out flat?
Three possible reasons: (1) the panade wasn't dried enough (lacked the white film on the pan); (2) the eggs were added while the dough was too hot; or (3) the oven wasn't hot enough. Make sure your oven is fully preheated to 425°F and use an oven thermometer to verify.
Is there a way to fix cracked or broken cream puffs?
Small cracks can be disguised with caramel during assembly — the caramel will seal them. Badly cracked puffs can be crumbled and used as a crunchy garnish around the base of the tower.
How do I serve the croquembouche?
Present the tower whole on a platter. At the table, use two forks to gently pry individual puffs loose. Each guest takes 2 to 3 puffs. The tower is meant to be deconstructed at the table — it's as much a performance as it is a dessert.
🔗 Related Recipes
- Classic Choux Pastry (Pasta Choux)
- Vanilla Pastry Cream (Crema Pasticcera)
- Profiteroles with Chocolate Sauce
- Éclairs with Coffee Pastry Cream
- Italian Lemon Meringue Pie
- Fresh Strawberry Tart with Pastry Cream
- Paris-Brest — Praline Cream Ring
🏷️ Search Tags
Photo reference: `vol1_72.png` — Christmas croquembouche on an ivory serving platter, dramatic tower of caramel-glazed cream puffs in a cone shape, delicate spun-sugar threads draped over the top and cascading down the sides, warm amber caramel highlights catching the light, dark linen backdrop with scattered pomegranate seeds and rosemary sprigs for holiday color, 45-degree angle, festive atmosphere.
Recipe from "The Italian Kitchen" by Vita Milanese — Volume 1: Pasta Perfetto
Recipe from The Italian Kitchen by Vita Milanese — Volume 1 · Pasta Perfetto. Discover all volumes on the ebook page.