Pate Brisee Savory Shortcrust
Category: Preparazioni di base, Pane & Pastry
| Amount | Ingredient |
|---|---|
| 250 g (2 cups) | All-purpose flour (or tipo "00" flour) |
| 125 g (½ cup + 1 tbsp) | Unsalted butter, very cold, cut into ½-inch (1 cm) cubes |
| 1 tsp | Fine sea salt |
| 1 | Large egg yolk |
| 3–4 tbsp (45–60 ml) | Ice-cold water |
Yield: 1 large tart shell (9–10 inch / 23–25 cm)
Prep time: 15 minutes active + 30 minutes chilling
Difficulty: Easy
A classic French savory shortcrust pastry — buttery, tender, and crisp — built on just five ingredients and a simple rub-in technique, perfect for quiches, savory tarts, and rustic galettes.
Pâte brisée is the savory cornerstone of French pastry-making, the unsung hero behind every great quiche Lorraine, tarte aux légumes, and pissaladière. Unlike its sweet cousin pâte sucrée (which includes sugar and often egg yolks for a cookie-like texture), pâte brisée is lean, savory, and shatteringly crisp — designed to cradle rich, custardy fillings without competing with them. The method is the same as making biscuit dough or scones: cold butter is rubbed into flour until the mixture resembles coarse meal, then bound with just enough liquid to bring it together. A brief rest in the refrigerator relaxes the gluten, making the dough easier to roll and ensuring a tender, flaky crust that holds its shape through blind baking.
What makes this particular recipe reliable is the ratio: 250 g of flour to 125 g of butter (a 2:1 ratio by weight) yields a crust that's rich enough to be flavorful but sturdy enough to support even the wettest fillings. One egg yolk adds tenderness and a pale golden color; cold water provides just enough hydration to bring the dough together without developing toughness. The result is a pastry that rolls out like a dream, bakes to a deep golden brown with visible flaking, and provides the perfect structural foundation for any savory tart or quiche.
> The dough can be made up to 3 days ahead and refrigerated, or frozen for up to 3 months. Blind-baking instructions are included separately as the final step — the dough itself is complete after chilling.
Use digital scale measurements for precision — weight is far more reliable than volume for pastry. The flour should be measured by spooning into the measuring cup and leveling off, or better yet, weighed directly. For the butter, the colder the better: pop the cubed butter into the freezer for 10 minutes before starting. The egg yolk adds richness and tenderness; if you want a slightly sturdier, more water-resistant crust (ideal for very wet fillings), you can substitute 2 tablespoons (30 ml) ice-cold water for the egg yolk, but the crust will be less tender and paler in color. Tipo "00" flour (the finely milled Italian standard) produces an exceptionally tender, melt-in-the-mouth texture; all-purpose flour gives a slightly more robust, everyday crust. Both work beautifully.
🥘 Equipment
- Digital kitchen scale
- Large mixing bowl
- Pastry blender, two knives, or fingertips (for rubbing in butter)
- Fork or small whisk (for mixing egg yolk and water)
- Rubber spatula or bench scraper
- Plastic wrap
- Rolling pin
- 9- or 10-inch (23–25 cm) tart pan with removable bottom (fluted preferred)
- Parchment paper
- Pie weights or dried beans (for blind baking)
- Baking sheet
- Wire cooling rack
- Pastry brush (optional, for egg wash)
- Sharp knife or pastry wheel (for trimming)
- Fork (for docking the pastry)
📋 Preparation
Step 1 — Combine Dry Ingredients (2 minutes)
In a large mixing bowl, whisk together the 250 g (2 cups) flour and 1 tsp salt until well combined. This ensures the salt is evenly distributed throughout the dough — a salty patch in the finished crust is disappointing.
Step 2 — Rub in the Butter (5 minutes)
Scatter the 125 g (½ cup + 1 tbsp) chilled cubed butter over the flour mixture.
Using a pastry blender, two knives, or your fingertips, work the butter into the flour until the mixture resembles coarse meal with some pea-sized butter pieces still visible. The texture should look like damp sand with visible flakes and chunks of butter — these are what create the flaky layers in the baked crust.
If using your fingertips: work quickly, lifting the mixture and rubbing the butter and flour between your thumbs and fingertips. If the butter starts to feel soft or greasy, refrigerate the bowl for 5 minutes before continuing. The goal is to coat the butter particles in flour without melting them — once the butter is warm, the dough will be heavy and greasy rather than light and flaky.
The visible butter pieces are not a sign of incomplete mixing — they are the secret to a flaky crust. In the oven, these butter pockets melt and release steam, creating tiny air pockets that separate the flour layers into delicate, shatteringly crisp flakes. If you overwork the butter into the flour until the mixture is homogeneous and sandy (like cornmeal), the crust will be dense and shortbread-like rather than flaky.
Step 3 — Add Egg Yolk and Water (3 minutes)
In a small bowl, whisk together 1 egg yolk and 3 tablespoons ice-cold water with a fork until combined.
Make a well in the center of the flour-butter mixture. Pour in the egg yolk mixture.
Using a fork or your fingertips, gradually draw the flour mixture into the liquid, stirring and tossing until the dough begins to clump together. Add the remaining 1 tablespoon of water if the dough seems dry and crumbly — the amount needed depends on the humidity of your flour and the exact size of your egg yolk.
The dough is ready when it holds together when squeezed in your fist but still looks slightly shaggy and uneven — it should not form a smooth, cohesive ball. If there are dry, floury bits at the bottom of the bowl, you need a touch more water. If the dough is sticky and wet, you've added too much water (sprinkle with a teaspoon of flour and work it in gently).
The "less is more" principle applies here. Under-hydrated dough is easier to fix than over-hydrated dough. A shaggy, just-barely-together dough is perfect — it will come together during the rest in the refrigerator. If you knead or press the dough into a smooth ball at this stage, you risk developing gluten, which will make the baked crust tough and prone to shrinking.
Step 4 — Form into a Disc (2 minutes)
Turn the shaggy dough out onto a lightly floured work surface. Gently gather the dough into a mound, then press it together with your hands — use the heel of your hand to push any loose crumbs into the mass. Do not knead.
Shape the dough into a disc about ¾ inch (2 cm) thick and 4 to 5 inches (10 to 13 cm) in diameter. A disc is better than a ball — it chills more evenly, rolls out more uniformly, and is easier to wrap.
Wrap tightly in plastic wrap and refrigerate for at least 30 minutes (or up to 3 days).
The disc shape is intentional: when it's time to roll the dough, a disc ensures even thickness from center to edge. A ball-shaped dough forces you to press it down into a disc before rolling, which can create uneven thickness. Press any cracks or splits at the edges back together before wrapping — they'll stay sealed during chilling.
Step 5 — Roll Out and Line the Pan (10 minutes)
Remove the dough from the refrigerator and let it sit at room temperature for 5 to 8 minutes — this softens it just enough to roll without cracking. If it's been chilled for more than an hour, it may need 10 minutes at room temperature.
Lightly flour your work surface and rolling pin. Place the disc on the floured surface and begin rolling from the center outward, rotating the dough a quarter-turn after each pass. Apply even, gentle pressure — do not roll over the edges, which will make them too thin.
Roll the dough into a round about 12 inches (30 cm) in diameter and ⅛ inch (3 mm) thick — roughly 2 inches (5 cm) larger than your tart pan all around.
To transfer: Gently roll the dough around your rolling pin, then unroll it over your 9- or 10-inch (23–25 cm) tart pan. Gently press the dough into the fluted edges and against the bottom and sides of the pan, using a small ball of scrap dough to press it into the grooves without tearing. Do not stretch the dough — stretched dough will shrink during baking.
Trim the excess: Run your rolling pin across the top of the tart pan to cut off the overhanging dough cleanly. Alternatively, use a sharp knife to trim the edges, leaving a ½-inch (1 cm) overhang. Fold the overhang inward (toward the center of the pan) and press it against the sides to create a thicker, reinforced edge.
Dock the bottom: Prick the bottom of the pastry all over with a fork — about 20 to 25 holes — to allow steam to escape during baking.
Chill again: Refrigerate the lined tart pan for 15 minutes while the oven preheats. This second chill is critical: it relaxes any gluten that developed during rolling and re-chills the butter, preventing the pastry from shrinking or slumping during blind baking.
If the dough tears during rolling or transfer, don't panic. Simply press the torn edges back together with your fingers — the dough is forgiving and patches easily, especially when cold. For a decorative edge, press the tines of a fork around the rim after trimming, or crimp with your fingers for a classic fluted finish. The reinforced edge (folding the overhang inward) is a pro technique that prevents the crust from collapsing during baking and gives a more substantial, bakery-style rim.
Step 6 — Blind Bake the Shell (20–25 minutes)
Preheat the oven to 375°F (190°C) with a rack in the middle position.
Line the chilled tart shell with a sheet of parchment paper, pressing it into the corners and up the sides. Fill all the way to the rim with pie weights or dried beans — the weights must reach the very top edge to prevent the sides from collapsing.
Bake for 15 minutes at 375°F (190°C). Carefully remove the parchment and weights by lifting the corners. Return the shell to the oven and bake for another 5 to 10 minutes, until the bottom is dry, set, and pale golden — it should look matte and feel firm to the touch. If the bottom puffs up during baking, gently press it down with the back of a spoon.
Transfer to a wire rack and let cool completely before filling. If you're filling immediately, let it cool for at least 15 minutes to prevent the filling from melting the fat in the pastry.
For a fully baked shell (for fillings that don't require further baking, like cold mousses or no-bake tarts), bake for an additional 5 to 8 minutes after removing the weights, until the entire shell is an even, medium golden brown — about 20 to 23 minutes total. Watch the edges carefully; they brown faster than the center and may need a foil ring shield if they darken too quickly. For a par-baked shell (for quiches and custard tarts that will bake further), remove it from the oven when the bottom is just set and dry but still very pale — the final bake will finish coloring the crust. The blind-baking times above are calibrated for a par-baked shell; add 5 minutes for a fully baked shell.
🧑🍳 Chef's Tips
- Weigh your ingredients. Pastry is about ratios — 2 parts flour to 1 part butter by weight. Using volume measurements (cups) introduces variability; a scale guarantees consistent results every time. A digital kitchen scale is the single best investment you can make for pastry success.
- Keep everything cold. Cold butter, cold water, cold hands, cold work surface. If at any point the dough feels warm, sticky, or greasy, wrap it and refrigerate for 15 minutes before proceeding. Warm butter doesn't create steam pockets — it creates a greasy, dense crust.
- Don't overwork the dough. Overworking develops gluten, which makes the crust tough and causes it to shrink during baking. Stop mixing as soon as the dough holds together. A shaggy, uneven-looking dough is the hallmark of a tender crust.
- Rest the dough twice. The first rest (30 minutes in the refrigerator) relaxes the gluten and allows the flour to fully hydrate. The second rest (15 minutes after lining the pan) prevents shrinkage during blind baking. Both are non-negotiable for a perfect crust.
- Use quality butter. European-style butter (like Plugrà, Kerrygold, or Président) has a higher fat content (82–84%) and lower water content than standard American butter (80%). This means less water to hydrate the flour, resulting in a flakier, more tender crust. If using European butter, you may need 1 less tablespoon of water.
- Save the egg white. The leftover egg white from the yolk can be lightly beaten and brushed on the bottom of the par-baked shell before adding wet fillings. This creates a "waterproof" seal (called egg wash sealing or pastry varnishing) that prevents the custard from soaking into the crust and making it soggy.
- Flour type matters. Tipo "00" flour (common in Italian recipes) produces a more tender, delicate crust due to its very fine grind and lower protein content (about 9%). All-purpose flour (10–12% protein) gives a sturdier, more robust crust. For the most tender result, use a 50/50 blend of all-purpose and pastry flour.
- Make a double batch. This dough freezes beautifully, and having a disc ready in the freezer means you're always 15 minutes away from a homemade tart. Double the ingredients, divide into two discs, wrap individually, and freeze for up to 3 months.
- Patch tears with scraps. If the dough cracks or tears while rolling, simply pinch off a small piece of scrap dough, press it over the tear, and roll over it gently to blend. The patch will be invisible after blind baking.
- Chill the lined pan before baking. This is the most commonly skipped step and the one that makes the biggest difference. A well-chilled lined pan ensures minimal shrinkage and a crisp, defined fluted edge.
❌ Common Mistakes
| Mistake | Why It Hurts | The Fix |
|---|---|---|
| Butter is too warm when cutting in | Butter melts into flour instead of creating separate pockets; crust is greasy and dense, not flaky | Chill cubed butter in the freezer for 10 minutes before starting; refrigerate the bowl for 5 minutes if the mixture feels warm |
| Dough is kneaded or overmixed | Gluten develops, making the crust tough and prone to shrinking | Stop mixing as soon as the dough holds together; a shaggy, lumpy dough is correct |
| Too much water added | Dough becomes sticky and requires extra flour during rolling, which toughens it; crust bakes up hard and dense | Add water 1 tablespoon at a time; the dough should just barely hold together when squeezed |
| Not enough water | Dough cracks and crumbles during rolling; edges don't seal | If the dough won't hold together, sprinkle with cold water 1 teaspoon at a time and toss gently with a fork |
| Dough isn't chilled before rolling | Dough sticks to the work surface and rolling pin; it's difficult to transfer without tearing | Chill for the full 30 minutes; if it's too firm to roll, let it sit at room temperature for 5–8 minutes |
| Dough is stretched when lining the pan | The elastic recoil causes the pastry to shrink during blind baking | Gently press the dough into the pan without pulling or stretching; lift and lower it into position |
| Shell isn't docked (pricked) | Steam builds up under the pastry, causing large bubbles and an uneven crust | Prick the bottom 20–25 times with a fork before blind baking |
| Pie weights don't reach the rim | The sides of the tart collapse inward during blind baking | Fill the weights all the way to the top edge of the pan; press them firmly into the corners |
| Shell is under-baked (pale and soft) | The crust absorbs moisture from the filling and turns soggy | Bake until the bottom looks dry, matte, and pale golden — it should feel firm when tapped |
| Shell is over-baked (dark brown) | Edges burn and taste bitter; the crust becomes brittle and crumbly | Watch the edges carefully during the last 5 minutes of blind baking; shield with foil strips if they darken too quickly |
💡 Variations
| Variation | How To |
|---|---|
| Herb Shortcrust (Pâte Brisée aux Herbes) | Add 1 tbsp finely chopped fresh herbs (thyme, rosemary, oregano, or a mix) to the flour before rubbing in the butter. Perfect for Mediterranean tarts with tomato, zucchini, and goat cheese. The herbs infuse the entire crust with fragrance. |
| Cheese Shortcrust (Pâte Brisée au Fromage) | Add 50 g (½ cup) finely grated Parmigiano-Reggiano, Gruyère, or Pecorino to the flour after the butter is rubbed in. Reduce the salt to ½ tsp. The cheese adds umami, crispness, and a beautiful golden color. Ideal for quiches, onion tarts, and cheese-based savories. |
| Whole Wheat Shortcrust | Replace 100 g (¾ cup) of the all-purpose flour with whole wheat flour. Add 1 extra tablespoon of cold water. The crust will be nuttier, more rustic, and slightly less tender — a wonderful match for earthy fillings like mushroom, leek, or root vegetable tarts. |
| Spelt Shortcrust | Replace the all-purpose flour entirely with spelt flour. Spelt has a delicate, nutty flavor and is easier to digest for some people. The dough will be slightly more fragile and may require an additional tablespoon of water. Blind-bake weights are especially important. |
| Gluten-Free Shortcrust | Use a 1:1 gluten-free flour blend (with xanthan gum). Add 1 extra tablespoon of cold water or 1 additional egg yolk. The dough will be more crumbly and harder to roll; press it directly into the tart pan with your fingers rather than rolling. Blind-bake fully before filling. |
| Black Pepper and Parmigiano Crust | Add 1 tsp coarsely ground black pepper and 50 g (½ cup) grated Parmigiano-Reggiano to the flour. The peppery kick cuts through rich, creamy quiche fillings beautifully. A classic pairing with mushroom and spinach tarts. |
| Lemon-Thyme Crust | Add 1 tsp finely grated lemon zest and 1 tbsp fresh thyme leaves to the flour. The bright citrus and herbal notes are perfect for spring and summer tarts with asparagus, peas, or seafood fillings. |
| Pâte Brisée with Lard | Replace 50 g (¼ cup) of the butter with 50 g (¼ cup) chilled leaf lard (rendered pork fat). Lard creates an exceptionally flaky, tender crust with a savory depth that butter alone can't match. Traditional in French country cooking. Reduce the salt to ½ tsp. |
| Pâte Brisée with Olive Oil (Italian Pasta Frolla Salata) | Replace the butter with 100 ml (⅓ cup + 1 tbsp) cold extra-virgin olive oil. Use a fork to mix the oil into the flour until the mixture resembles wet sand, then add the egg yolk and water. The crust is less flaky but more rustic, with a fruity olive oil flavor. Common in southern Italian savory pies (torte salate). |
| Seeded Crust | After lining the pan, sprinkle the bottom with 1 tbsp sesame seeds, poppy seeds, or nigella seeds before docking and blind baking. The seeds toast during baking and add texture and visual appeal. |
❄️ Storage & Make-Ahead
| Method | Details |
|---|---|
| Refrigerator (unbaked dough) | Wrapped tightly in plastic wrap, the dough keeps for up to 3 days. Let it sit at room temperature for 10 minutes before rolling. The flavor actually improves after a day as the salt and flour meld. |
| Freezer (unbaked dough disc) | Wrap the disc tightly in plastic wrap, then in aluminum foil. Freeze for up to 3 months. Thaw overnight in the refrigerator before rolling. Do not thaw at room temperature — the butter can soften unevenly. |
| Freezer (lined tart pan) | Line the tart pan, wrap the entire pan tightly in plastic wrap (or two layers), then in foil. Freeze for up to 2 months. Bake directly from frozen, adding 5 minutes to the blind-baking time. |
| Refrigerator (blind-baked shell) | Cool completely, wrap loosely in plastic wrap (do not seal tightly — trapped moisture will soften the crust), and store at room temperature for up to 2 days. For longer storage, freeze as described below. |
| Freezer (blind-baked shell) | Cool completely, wrap in plastic wrap and then foil. Freeze for up to 1 month. Fill and bake directly from frozen (add 5–10 minutes to the final bake time). |
| Room temperature (blind-baked shell) | Store in an airtight container at room temperature for up to 2 days. The shell will stay crisp. Do not refrigerate an already-baked shell — the moisture in the refrigerator will soften it. |
| Make-ahead tip: double batch | Make a double batch of dough, shape into 2 discs, wrap individually, and freeze. You'll always have a tart shell ready to go. Bake from frozen for impromptu tarts and quiches. |
Note: Pâte brisée, like all butter-based pastries, is at its peak when freshly baked. While the unbaked dough stores beautifully, the baked shell is best used within 24 hours for maximum crispness. If the shell has softened after storage, re-crisp it in a 350°F (180°C) oven for 5 minutes before filling.
🍷 Wine Pairing
| Wine | Why |
|---|---|
| Chablis (Burgundy) | The unoaked, mineral-driven Chardonnay has piercing acidity that cuts through the buttery pastry. A classic French pairing with any quiche or savory tart made with this crust. |
| Sancerre (Loire Valley) | Crisp, herbaceous Sauvignon Blanc with notes of citrus and flint. The grassy, herbal notes mirror the herb variations in the pastry. Excellent with vegetable or goat cheese tarts. |
| Pinot Gris (Alsace) | Medium-bodied with ripe stone fruit and a hint of spice. Richer than Sancerre but still dry, it stands up to cheese-laden quiches and hearty meat tarts. |
| Crémant d'Alsace (Brut) | A French sparkling wine made in the traditional method, offering fine bubbles and bright acidity. The effervescence cleanses the palate between rich, buttery bites. |
| Beaujolais (Cru) | A light, fruity red with low tannins and bright acidity — the only red that pairs naturally with savory tarts. Serve slightly cellar-cool (55°F / 13°C) rather than room temperature. |
| Prosecco Brut (Veneto) | Light, lively bubbles and green apple notes — a festive, versatile pairing that works with any savory tart, from quiche to vegetable galette. |
🍺 Beer Pairing
| Beer | Why |
|---|---|
| French Blonde Ale | Clean, crisp, with a subtle malt sweetness that complements the buttery crust without overwhelming delicate fillings. |
| Pilsner (Czech or German) | Bright, bitter, and highly carbonated — the bitterness cuts through the fat, making it a palate-cleansing partner. |
| Saison / Farmhouse Ale | Spicy, fruity yeast notes and a dry finish that echoes the herb variations and cheese additions in the crust. |
| Witbier (Belgian White) | Hazed with wheat, spiced with coriander and orange peel — the citrusy, spicy notes are a natural match for seafood or vegetable tarts. |
| Amber Ale | Toasty, caramel malt flavors mirror the nuttiness of a whole wheat or spelt crust. Best with cheese-heavy fillings. |
🥗 Ideal Fillings & Companions
- Quiche Lorraine — The definitive filling: bacon lardons, eggs, cream, and nutmeg. The buttery, unsweetened crust is made for this custard.
- Pissaladière — Provençal onion, anchovy, and olive tart. The crisp crust supports the jammy, slow-cooked onions without becoming soggy.
- Tarte aux Légumes — Roasted seasonal vegetables (zucchini, bell peppers, eggplant, tomatoes) with goat cheese or ricotta.
- Mushroom and Gruyère Tart — Sautéed wild mushrooms with garlic and thyme, bound with cream and melted Gruyère.
- Tomato and Pesto Galette — A free-form tart with cherry tomatoes, basil pesto, and fresh mozzarella.
- Caramelized Onion and Goat Cheese Tart — Sweet, slow-cooked onions spread over the crust, topped with crumbled goat cheese and fresh thyme.
- Savory Leek and Blue Cheese Tart — Sautéed leeks in cream, topped with crumbled Roquefort or Gorgonzola. The mild leeks and pungent blue cheese are a classic pairing.
- Tarte aux Fromages (Cheese Tart) — A blend of Gruyère, Emmental, and Comté in a custard base. The cheese lover's tart, made even better with the cheese crust variation.
- Prosciutto and Fig Tart — Thin slices of prosciutto, halved fresh figs, and a drizzle of honey over a bed of ricotta. Sweet-savory perfection on a crisp crust.
- Spring Vegetable Tart — Asparagus, peas, artichoke hearts, and fresh mint in a light ricotta and lemon custard.
📊 Nutrition (per ⅙ of the tart shell — unbaked weight)
| Calories | Protein | Fat | Carbs | Fiber | Sugar |
|---|---|---|---|---|---|
| ~290 | 5 g | 18 g | 28 g | 1 g | 0.3 g |
Nutritional values are estimates for the baked pastry shell alone (⅙ of the total recipe), without filling. The majority of the calories come from butter (about 130 calories per serving from fat alone) and flour (about 110 calories from carbohydrates). One serving provides approximately 10% of the daily recommended intake of vitamin A (from the butter and egg yolk) and 8% of calcium. This crust is naturally free of added sugars (the minimal sugar content comes from the natural sugars in the flour). For a lower-calorie version, reduce the butter to 100 g (7 tbsp) and add 1 extra tablespoon of ice water — the crust will be less rich and flaky but still functional. The full crust (all 6 servings) contains approximately 1,740 calories, 108 g of fat, 168 g of carbohydrates, and 30 g of protein. Note that once filled, the nutritional profile changes dramatically based on the filling — a quiche Lorraine filling (eggs, cream, bacon, cheese) will add approximately 250–350 calories per slice, while a vegetable tart with ricotta will add approximately 150–200 calories per slice. As a general rule, this crust adds about 290 calories per serving to any tart or quiche; plan your fillings accordingly.
❓ Frequently Asked Questions
What is the difference between pâte brisée, pâte sucrée, and pâte sablée?
Pâte brisée is the savory workhorse of French pastry: no sugar, high butter-to-flour ratio, rubbed-in method. Pâte sucrée is a sweet shortcrust that includes sugar and sometimes egg yolks; it's creamed together (like cookie dough) rather than rubbed in, resulting in a more tender, cookie-like texture. Pâte sablée is even richer, with a higher proportion of butter and egg yolks, and is pressed into the pan rather than rolled — it has a sandy, melt-in-the-mouth texture (the name means "sandy pastry"). Use pâte brisée for savory tarts and quiches, pâte sucrée for fruit tarts and dessert tarts, and pâte sablée for delicate tartlets and linzer-style pastries.
Can I make pâte brisée in a food processor?
Yes — and it's faster and more consistent. Pulse the flour, salt, and cold cubed butter in the bowl of a food processor until the mixture resembles coarse meal (about 8–10 one-second pulses). Add the egg yolk and 3 tablespoons of ice water, then pulse again until the dough just begins to clump together (about 5–6 pulses). Do not run the processor continuously — this will overwork the dough. Turn the shaggy dough out onto a work surface and gather it into a disc. The food processor method is ideal for hot days when hand-rubbing would melt the butter.
Why did my pastry shrink during blind baking?
The most common causes are: (1) the dough was stretched when lining the pan — stretched dough always snaps back; (2) the dough wasn't chilled long enough after lining the pan — the second 15-minute chill is essential; (3) the dough was overworked and developed too much gluten; (4) the pie weights didn't reach the rim — the sides had nothing to hold them in place. To fix: next time, lift the dough into the pan without stretching, chill for a full 15 minutes after lining, and fill the weights all the way to the top edge.
Why is my pastry tough and hard instead of tender and crisp?
Tough pastry is almost always the result of overworking the dough, which develops gluten. Handle the dough as little as possible — stop mixing when it just holds together, roll gently without pressing too hard, and don't reroll scraps more than once. Another cause: too much water. The dough should be just barely hydrated. Finally, if the oven temperature is too low, the butter melts slowly and the pastry essentially poaches in butterfat rather than baking quickly, resulting in a dense, greasy texture. Make sure your oven is fully preheated to 375°F (190°C) before blind baking.
Can I use salted butter instead of unsalted?
You can, but reduce the added salt to ¼ teaspoon (salted butter contains approximately ¼ teaspoon of salt per stick). The flavor may be slightly less clean, and salted butters vary widely in their salt content, making consistency harder to achieve. For best results, use unsalted butter so you control the salt level precisely.
My dough cracks and crumbles when I try to roll it. What's wrong?
The dough is either too cold (it needs to sit at room temperature for 5–10 minutes) or too dry (not enough water). If it's very firm and cracks along the edges when you press it, let it warm up slightly. If it crumbles into dry bits no matter what, you need more hydration — sprinkle with ice water 1 teaspoon at a time, toss with a fork, and gather the dough back into a disc. Chill for 15 minutes before rolling again.
Can I use this dough for sweet tarts?
The dough contains no sugar, so the crust will be savory — which can work beautifully with sweet-savory fillings like apple and Gorgonzola tart, pear and blue cheese, or roasted fig and honey. For classic sweet tarts (fruit tart, lemon tart, chocolate tart), use pâte sucrée or pâte sablée instead. However, if you add 2 tablespoons (25 g) of granulated sugar to the flour, this dough transforms into a rudimentary sweet shortcrust — not as rich as true pâte sucrée, but serviceable for rustic desserts.
What is the best way to store leftover baked tart shell?
Cool the baked shell completely, then store it in an airtight container at room temperature (not in the refrigerator — the moisture will soften it). It will stay crisp for 1 to 2 days. To re-crisp, place in a 350°F (180°C) oven for 5 minutes. Do not wrap tightly in plastic wrap, as trapped moisture will soften the crust. If you need to store a filled tart, refrigerate the entire tart and accept that the crust will soften slightly — re-crisping isn't possible with a filled tart.
Can I substitute the egg yolk with something else?
The egg yolk adds richness, tenderness, and a golden color. For an egg-free version, replace the yolk with 1 additional tablespoon of ice-cold water (the crust will be less tender and paler). For a vegan version, substitute the butter with cold vegan butter (like Miyoko's or Earth Balance) and replace the egg yolk with 1 tablespoon of aquafaba (chickpea brine) or 1 tablespoon of ice water. The texture will be different — less flaky and more crumbly — but the crust will still be functional. For a dairy-free but not egg-free version, use all the same ingredients but replace the butter with cold coconut oil (solid, not melted) — the crust will have a subtle coconut aroma that pairs best with tropical or spicy fillings.
How do I get a perfectly flat, even bottom on my baked tart shell?
Three tips: (1) dock the bottom thoroughly with a fork — at least 20 to 25 holes; (2) press the parchment or foil firmly into the corners when lining for blind baking; (3) fill the weights all the way to the rim and gently press them into the corners. If the bottom still puffs up during blind baking, remove the weights and parchment, then press the puffed area down with the back of a spoon. Return to the oven for the remaining bake time — the bottom will stay flat.
🔗 Related Recipes
- Pumpkin and Cured Meat Quiche (#423) — A golden, custardy Italian quiche that uses this exact pâte brisée as its foundation. See the recipe for filling and assembly instructions.
- Basic Shortcrust Pastry — Pasta Frolla (#124) — The sweet Italian cousin of pâte brisée, made with sugar and lemon zest. Use the savory variation (herbs, cheese, pepper) for an equally excellent tart crust with an Italian twist.
- Puff Pastry (#301) — The laminated, labor-intensive cousin of shortcrust. If you love the flakiness of pâte brisée, puff pastry takes it to the next level with 73+ layers of butter and dough.
- Puff Pastry Cottage Cheese and Asparagus (#248) — A savory puff pastry creation that demonstrates the versatility of pastry-making beyond shortcrust. Same concept (savory pastry + filling), different technique.
- Air Fryer Ham and Cheese Pastries (#373) — Another use for pastry in the savory Italian canon, this time with store-bought puff pastry and an air fryer shortcut. Shows how pastry doughs are the building blocks of countless dishes.
- Éclair Cream and Chocolate (#106) — The choux pastry equivalent of this savory shortcrust — a different type of pastry dough, but the same principle of mastering a foundational dough to build from.
- Pistachio Paste (Pasta di Pistacchio, #405) — A pantry preparation that pairs beautifully with this crust for a pistachio-flecked savory tart. Spread a thin layer of pistachio paste on the blind-baked shell before adding fillings for a nutty depth.
- Tomato Tart with Pesto (#188) — A classic summer tart that uses either pâte brisée or puff pastry; the herb variation of this crust (rosemary and thyme) makes it sing.
- Caramelized Onion Tart — Tarte à l'Oignon (#210) — The Alsatian classic, relying on a perfect pâte brisée to cradle the jammy, sweet onion filling.
- Savory Galette with Roasted Vegetables (#290) — A free-form, rustic tart that uses any shortcrust pastry. A forgiving, beautiful way to showcase seasonal vegetables without needing a tart pan.
🏷️ Search Tags
📸 Photo Reference
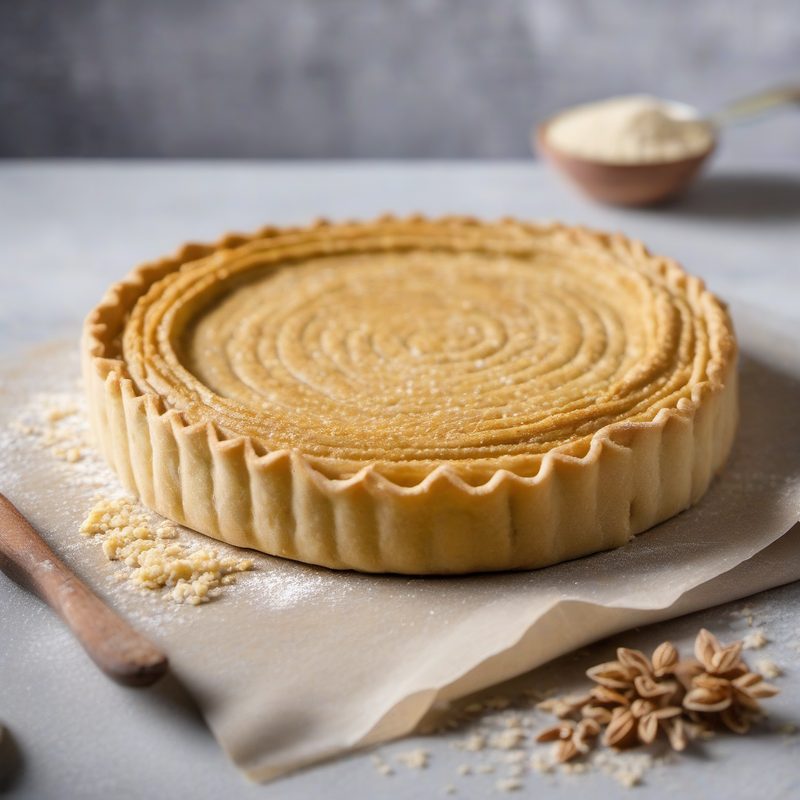
Photo reference: `vol1_442.png` — A top-down, slightly elevated shot of a fully blind-baked pâte brisée shell resting in a fluted 9-inch tart pan with a removable bottom, set on a lightly floured wooden work surface. The crust is an even, pale golden brown with visible flaking along the crimped edges — the hallmark of a perfectly baked shortcrust. A thin, even layer of tiny fork holes dots the bottom of the shell. Beside the tart pan: a small bowl of leftover diced butter cubes, a heap of all-purpose flour dusting the board, a metal pastry blender with traces of butter and flour on its wires, a rolling pin, a small dish with a single egg yolk next to a bowl of ice water, and a bundle of wrapped plastic containing a spare disc of dough. A small kitchen scale shows the 2:1 flour-to-butter ratio (250 g flour, 125 g butter). In the background, a shallow bowl of pie weights and a sheet of crumpled parchment paper suggest the blind-baking process has just been completed. A single sprig of fresh thyme rests beside the pan, hinting at the herb variation. The lighting is warm, natural daylight from a side window — soft and diffused, casting gentle shadows that emphasize the fluted edges and the crisp, matte surface of the baked shell. A pair of wire cooling racks sits stacked in the soft-focused background. The overall mood is precise, artisanal, and classroom-like — the kind of image that says "This is the foundation. Master this, and everything else follows."
Recipe from "The Italian Kitchen" by Vita Milanese — Volume 1: Pasta Perfetto 🥟
Recipe from The Italian Kitchen by Vita Milanese — Volume 1 · Pasta Perfetto. Discover all volumes on the ebook page.