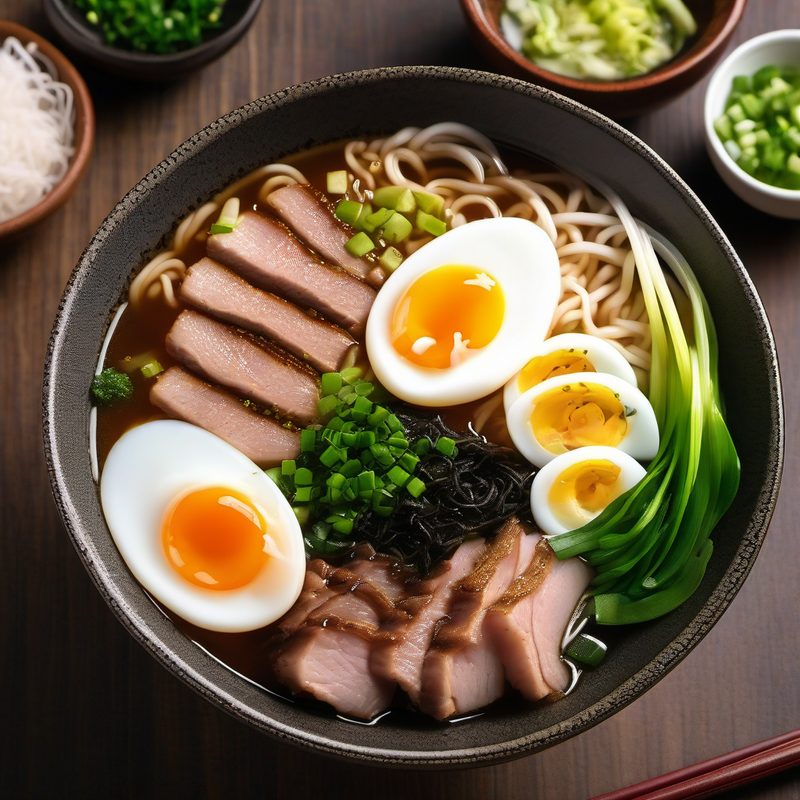
Japanese Ramen
Category: Zuppe (Soups), Cucina giapponese (Japanese Cuisine)
| Amount | Ingredient |
|---|---|
| Toasted white sesame seeds | 1 tablespoon For sprinkling |
| Chili oil (rayu) | To taste Homemade or store-bought (La-Yu brand recommended) |
| Shichimi togarashi | To taste Japanese seven-spice blend |
Servings: 4
Total Time: 5–7 hours (largely unattended)
Active Time: 45 minutes
Level of Difficulty: Advanced
1. WHY THIS RECIPE WORKS
Authentic Japanese ramen is not a quick weeknight soup — it is a labor of love built on a deeply extracted pork bone broth (tonkotsu) that achieves its signature milky-white opacity and velvety richness through prolonged, vigorous simmering. Our method follows the classic Japanese approach: pork bones are first blanched to remove impurities and blood, then scrubbed clean and simmered with aromatic vegetables for 4 to 6 hours at a gentle but active boil. The constant motion emulsifies the collagen and fat from the bones into the water, creating a broth that coats the tongue with luxurious intensity without being greasy. Seasoning with soy sauce (shoyu) and mirin creates a savory-sweet tare that marries perfectly with the rich broth, while freshly cooked ramen noodles, tender chashu pork belly, jammy soft-boiled eggs, crisp nori, and fresh green onions complete the bowl. A final drizzle of toasted sesame oil adds nutty depth and aromatic lift. Building each component (broth, chashu, eggs, tare) in parallel ensures everything comes together at the same moment for a bowl that rivals any ramen shop in Japan.
For the Broth
For the Chashu (Braised Pork Belly)
For the Soft-Boiled Eggs (Ajitsuke Tamago)
For Assembly
Optional Garnishes
3. EQUIPMENT
- Large stockpot (at least 8 litres / 8 quarts capacity) for the broth
- Medium saucepan or small pot (for chashu braising and egg cooking)
- Colander (for draining and rinsing bones)
- Chef's knife and cutting board
- Fine-mesh strainer or chinois
- Large bowl (for ice bath)
- Small bowl or cup (for tare)
- Slotted spoon or spider skimmer
- Tongs
- Kitchen twine (optional, for tying chashu)
- Plastic wrap (for covering chashu)
- 4 large ramen bowls (at least 600 ml / 2.5 cups capacity each)
- Small saucepan (for reheating the broth if needed)
- Instant-read thermometer (optional but helpful for eggs)
- Paper towels
- Ladle
4. PREPARATION
- Prepare the pork bones: Place the 1 kg of pork bones in a large stockpot and cover with cold water by 5 cm (2 inches). Bring to a boil over high heat. Once boiling, let the bones blanch for 10 minutes. During this time, a considerable amount of grayish foam and scum will rise to the surface — this is the blood and impurities being extracted. Drain the bones in a colander and discard the blanching water. Rinse the bones under cold running water, scrubbing each one with your fingers or a clean brush to remove any clinging scum. Set aside. The pot should be washed clean before proceeding.
- Prepare the aromatics: Halve the unpeeled onion crosswise. Smash the garlic cloves flat. Slice the unpeeled ginger into 5 mm rounds.
- Prepare the eggs: Remove the eggs from the refrigerator and let them sit at room temperature for at least 15 minutes (this ensures even cooking and easier peeling).
- Prepare the green onions: Wash and trim the root ends and dark green tops. Slice the white and light green parts thinly on a sharp bias. Set aside in a bowl lined with a damp paper towel.
- Prepare the chashu: If your pork belly slab is thicker than 5 cm, butterfly it to a uniform 4–5 cm thickness. Some cooks roll and tie the belly with kitchen twine for a more uniform cylindrical shape (classic chashu style). This is optional but recommended for even braising and attractive slicing.
5. BUILD THE BROTH
Place the cleaned, blanched pork bones back into the clean stockpot. Add the 3 litres (12 cups) of cold water, the halved onion, smashed garlic, and ginger rounds. Bring to a boil over high heat, then immediately reduce heat to maintain a vigorous simmer — the surface should be actively bubbling, not sitting at a gentle simmer. This constant agitation is what emulsifies the fat and collagen into the broth to create the signature creamy, milky-white tonkotsu texture.
Important: Do not let the broth boil over, and do not stir it. Let the bones tumble naturally in the rolling liquid. As scum and foam rise to the surface during the first 30 minutes, skim them off with a ladle or spider skimmer and discard. After the first 30 minutes, skimming is generally unnecessary.
Maintain the broth at a vigorous simmer for 4 to 6 hours. Check the water level every hour: if the bones become exposed, add enough boiling water to keep them submerged. The broth will gradually transform from a clear, grayish liquid to an opaque, creamy, milky-white soup. The color change is the signal that the fat and collagen have emulsified successfully.
At the 4-hour mark, the broth will be good — flavorful and creamy. At 6 hours, it will be exceptional — deeply savory, silky, and unctuous. The extra time is worth it if you can spare it.
When the broth reaches your desired level of richness, remove the pot from the heat. Strain the broth through a fine-mesh strainer or chinois into a clean container, pressing gently on the solids with a ladle to extract every drop of liquid. Discard the solids. You should have about 2–2.5 litres (8–10 cups) of finished broth. Set aside.
6. MAKE THE TARE (SEASONING SAUCE)
While the broth simmers, prepare the tare — the concentrated seasoning that gives the ramen its savory backbone:
In a small bowl, combine 4 tablespoons soy sauce and 2 tablespoons mirin. Stir to blend. Set aside.
Do not add the tare to the broth yet — it is added directly to each bowl during assembly so that each serving is seasoned precisely. This also allows diners to adjust the saltiness to their preference.
7. BRAISE THE CHASHU (PORK BELLY)
While the broth simmers, prepare the chashu:
Place the pork belly slab in a medium saucepan or small pot that fits it snugly (the closer the fit, the less braising liquid needed). Add the soy sauce, mirin, sake, sugar, ginger slices, and smashed garlic. Add enough cold water to barely cover the pork (about 200–300 ml, depending on the size of your pot).
Bring to a boil over medium-high heat, then reduce heat to low, cover, and maintain a gentle simmer. Braise the pork belly for 1½ to 2 hours, flipping the slab once halfway through. The pork should be fork-tender — a skewer inserted into the thickest part should meet no resistance.
When done, remove the pot from heat. Transfer the pork belly to a plate or cutting board. Let cool slightly, then wrap tightly in plastic wrap and refrigerate for at least 1 hour (or up to 3 days). Chilling the chashu makes it much easier to slice cleanly into thin, uniform pieces.
Reserve the braising liquid — it doubles as an excellent marinade for the soft-boiled eggs (see next section).
8. MAKE THE SOFT-BOILED EGGS (AJITSUKE TAMAGO)
Bring a medium saucepan of water to a rolling boil over high heat. Carefully lower the 4 room-temperature eggs into the boiling water using a slotted spoon. Boil for 6½ minutes for a jammy, liquid-center yolk (adjust by 30 seconds up or down based on your preference — 6 minutes for runnier, 7 minutes for firmer).
While the eggs boil, prepare an ice bath: fill a large bowl with cold water and a generous amount of ice.
When the timer goes off, immediately transfer the eggs to the ice bath using the slotted spoon. Let them cool for 5 minutes — this stops the cooking and makes peeling much easier.
While the eggs cool, prepare the marinade: In a small bowl or container (just large enough to hold the eggs in a single layer), combine 3 tablespoons soy sauce, 2 tablespoons mirin, and 200 ml (¾ cup) water. If you reserved the chashu braising liquid, replace half the water with 100 ml of the braising liquid for extra depth.
Peel the cooled eggs under a thin stream of running cold water (this helps separate the shell from the egg white). Submerge the peeled eggs in the marinade, cover, and refrigerate for at least 2 hours and up to 12 hours. The longer they marinate, the deeper the color and flavor penetration. Overnight (8–12 hours) yields the classic deep-brown, soy-stained ajitsuke tamago.
9. COOK THE NOODLES
About 5 minutes before you are ready to serve, bring a large pot of water (at least 5 litres / 5 quarts) to a rolling boil.
Fresh ramen noodles cook very quickly — typically 1½ to 2½ minutes. Check the package directions and set a timer. Do not overcook — ramen noodles continue to soften in the hot broth after they are served, so they should be slightly firmer (al dente) than you might normally prefer.
Dried ramen noodles take 3–4 minutes. Cook according to package directions, testing 30 seconds before the suggested time.
When the noodles are done, drain them immediately in a colander and shake off excess water. Do not rinse — the residual starch on the noodles helps the broth cling to them. Divide the noodles evenly among the four warm serving bowls.
10. ASSEMBLE THE BOWLS
While the noodles cook, bring the reserved broth to a near-boil in a clean saucepan or back in the stockpot. It should be piping hot — just below a boil.
Working quickly with one bowl at a time:
- Add the tare: Pour 1½ tablespoons (about 20 ml) of the soy-mirin tare into the bottom of each bowl.
- Add the broth: Ladle about 500–600 ml (2–2½ cups) of hot broth into each bowl over the tare. Stir gently to combine.
- Add the noodles: Place one portion of cooked noodles in the center of each bowl. Using chopsticks or a fork, gently spread the noodles so they sit neatly rather than clumped.
- Add the chashu: Remove the chilled chashu from the refrigerator and slice it against the grain into 5 mm (¼ inch) thick slices. Arrange 3–4 slices on top of the noodles in each bowl.
- Add the egg: Remove the marinated eggs from the marinade. Cut each egg in half lengthwise using a sharp knife (wipe the blade clean between cuts for neat halves). Place two halves in each bowl, cut side up, nestled against the chashu.
- Add the nori: Insert 2 nori halves (one full sheet cut in half) into each bowl so they stand partially upright against the side of the bowl, partially submerged in the broth. This keeps them crisp rather than soggy.
- Add the green onions: Scatter a generous pinch of sliced green onions (about 2 tablespoons) over the top of each bowl.
- Drizzle sesame oil: Finish each bowl with a few drops (about ½ teaspoon) of toasted sesame oil drizzled over the surface.
Serve immediately, with optional garnishes (toasted sesame seeds, chili oil, shichimi togarashi) on the side for diners to add as they wish.
11. VARIATIONS
- Shoyu Ramen (Soy-Sauce Base): Increase the soy sauce in the tare to 5 tablespoons and reduce the amount of broth slightly for a bolder, saltier finish. This is the classic Tokyo-style ramen.
- Miso Ramen: Omit the soy-mirin tare. Dissolve 3 tablespoons white or red miso paste in 100 ml (⅓ cup) hot broth per bowl before adding the remaining broth. Top with a pat of butter (unsalted) and a sprinkle of white pepper.
- Shio Ramen (Salt Base): Replace the soy-mirin tare with a simple salt-based tare: 2 tablespoons sake, 1 tablespoon sea salt, 1 teaspoon sugar, and 1 tablespoon sesame oil. Use lighter aromatics (leek instead of onion, white peppercorns instead of black).
- Spicy Ramen (Karai Ramen): Add 1–2 tablespoons chili oil (rayu) to the tare per bowl. Top with a small spoonful of mentaiko (spicy cod roe) or karashi takana (pickled mustard greens) for extra heat.
- Vegetarian Ramen: Replace pork bones with 2 large dried shiitake mushrooms, 1 kombu sheet (10 × 10 cm), and 1 carrot, 1 celery stalk, and 1 tomato. Simmer the vegetable broth for only 2 hours to avoid bitterness. Add 1 tablespoon white miso for body. Omit the chashu; substitute pan-seared tofu or king oyster mushrooms sliced into scallops.
- Tonkotsu Ramen (Extra Rich): Use only pork leg and femur bones (no meat). Add 1 tablespoon pork fatback (lardo) during the last hour of simmering for even more richness. The broth should be pure white and almost thick enough to coat the back of a spoon.
- Tsukemen (Dipping Noodles): Reduce the broth volume by half and simmer until reduced by a third to create a concentrated dipping sauce. Serve the cold, thick noodles and the concentrated hot broth in separate bowls. Garnish the dipping broth with a slice of sudachi (Japanese citrus) or yuzu zest.
12. MAKE AHEAD & STORAGE
- Broth: The broth is at its best the day it is made but can be refrigerated in an airtight container for up to 3 days or frozen for up to 3 months. Before freezing, cool the broth completely, then transfer to freezer-safe containers, leaving 2.5 cm (1 inch) of headspace for expansion. To reheat, thaw overnight in the refrigerator (if frozen), then bring to a near-boil in a saucepan over medium heat. The broth may separate slightly after freezing; a vigorous whisk or an immersion blender will re-emulsify it beautifully.
- Chashu: The braised pork belly can be made up to 3 days in advance and kept wrapped in plastic in the refrigerator. Slice just before serving. It can also be frozen (wrapped tightly in plastic, then foil) for up to 1 month. Thaw overnight in the refrigerator before slicing.
- Ajitsuke Tamago (Marinated Eggs): The peeled, marinated eggs keep for up to 3 days in the refrigerator in their covered marinade. The egg whites will continue to darken and firm slightly. Do not freeze — the texture becomes spongy and unappealing.
- Noodles: Fresh ramen noodles should be cooked the day of serving. Dried noodles can be cooked up to 1 hour in advance, tossed with a teaspoon of sesame oil to prevent sticking, and stored at room temperature. Do not refrigerate cooked noodles — they become gluey.
- Assembly: Ramen must be assembled per bowl and served immediately. Pre-assembled bowls that sit will have soggy noodles, lukewarm broth, and wilted garnish. The broth, noodles, and toppings should all be prepared ahead of time so that assembly takes no more than 2 minutes per bowl.
13. KEYS TO SUCCESS
- Blanch the bones thoroughly — the 10-minute blanch and subsequent scrub are non-negotiable. They remove the blood and impurities that would otherwise cloud the broth with an unpleasant gray color and off-flavors. A rinsed bone produces a clean, creamy broth.
- Maintain a vigorous simmer, not a gentle one — tonkotsu broth needs constant movement to emulsify the collagen and fat. Gentle simmering produces a clear broth (like a consommé), not the milky-white soup that defines good ramen. The bubbles should break the surface continuously.
- Do not skim after the first 30 minutes — the foam that rises early is impurities; the foam that rises later is emulsified protein and fat — the very components that give the broth its body and creaminess. Skim only in the first half-hour.
- Chill the chashu before slicing — warm pork belly is fragile and tears easily. A fully chilled slab (at least 1 hour in the fridge) slices cleanly into thin, attractive pieces that hold their shape in the hot broth.
- Cook eggs at room temperature — cold eggs straight from the refrigerator crack more easily when lowered into boiling water, and their cooking time is harder to predict. A 15-minute rest at room temperature ensures consistent, reliable results.
- Marinate the eggs for at least 2 hours — a shorter marination yields pale eggs with only surface seasoning. At least 2 hours gives noticeable color and flavor; 8–12 hours gives the classic dark-brown, deeply savory ajitsuke tamago.
- Do not rinse the cooked noodles — the surface starch left from cooking helps the broth cling to the noodles, ensuring every bite is flavorful. Rinsing washes this away and leaves the noodles slippery and bland.
- Heat the bowls — ramen bowls should be warmed before assembly. Either fill them with hot water and let them sit for 2 minutes, or heat them in a low oven (100°C / 210°F) for 5 minutes. Cold bowls steal heat from the broth instantly.
- Assemble in the correct order — tare at the bottom, then hot broth, then noodles, then toppings. This ensures the tare is evenly distributed throughout the broth rather than concentrated at the top.
14. COMMON MISTAKES & HOW TO AVOID THEM
| Mistake | Why It Happens | Fix |
|---|---|---|
| Broth is gray, not milky white | Bones not blanched; impurities not removed | Blanch bones for a full 10 minutes, scrub thoroughly, and drain well before simmering |
| Broth is thin and watery | Simmered too gently; not enough cooking time | Maintain a vigorous, rolling simmer; cook for a minimum of 4 hours |
| Broth tastes bland or flat | Insufficient bones or too much water; no tare added | Use the full 1 kg of bones per 3 litres of water; always add tare seasoning to each bowl |
| Broth is greasy and separates | Simmered too vigorously without enough collagen to emulsify the fat | Use bones with connective tissue (leg, neck, or femur bones); longer cooking (6 hours) helps |
| Chashu is dry and tough | Cooked too long at too high a temperature | Braise at a gentle simmer (not a boil) for 1½–2 hours; check for fork-tenderness at 90 minutes |
| Chashu falls apart when sliced | Sliced while still warm | Refrigerate for at least 1 hour before slicing; use a sharp chef's knife |
| Eggs are not jammy | Overcooked; cold eggs thrown into boiling water | Use room-temperature eggs; boil for exactly 6½ minutes; immediately transfer to an ice bath |
| Eggs are difficult to peel | Not cooled sufficiently; eggs are too fresh | Cool for a full 5 minutes in the ice bath; peeling under running water helps |
| Noodles are mushy in the bowl | Overcooked before adding to broth | Cook noodles 30 seconds less than the package suggests; they will continue cooking in the hot broth |
| Noodles are clumped and stuck together | Cooked without enough water; not stirred immediately | Use at least 5 litres of water; stir immediately after adding noodles to the boiling water |
| Bowl is lukewarm | Cold bowls; broth not hot enough | Warm the bowls before assembly; bring broth to a near-boil before ladling |
| Nori is completely soggy | Fully submerged in broth | Insert nori so it stands halfway submerged — the exposed portion stays crisp for contrast |
| Broth is too salty | Too much tare added per bowl | Use exactly 1½ tablespoons tare per bowl; let diners adjust with extra soy sauce at the table |
15. PLATING & GARNISH
Ramen is as much about visual presentation as it is about flavor — each bowl should feel like a complete landscape of textures and colors.
- Use wide, deep ramen bowls — traditional Japanese ramen bowls (donburi) are wide-mouthed with a generous capacity. The wide surface area allows the toppings to be arranged artfully without crowding.
- Build in quadrants: Mentally divide the bowl into four sections: noodles in the center-back, chashu on the right, egg halves on the left, and green onions scattered across the front. Nori sheets stand vertically between sections.
- The chashu should overlap slightly — arrange 3–4 slices of pork belly in a slight fan, each slice overlapping the next by about a third. This creates a sense of abundance and dimension.
- Egg halves should face up — the cut side of the jammy yolk should be visible and face the diner. This is the visual centerpiece of the bowl, and the contrast between the dark brown marinade-stained white and the bright golden yolk is striking.
- Nori should rise above the broth — insert each half-sheet so that approximately one-third is submerged and two-thirds stands above the broth surface. This creates a crackling crisp contrast with the soft, wet noodles below.
- Green onions should be scattered, not piled — a light, even scattering of thinly sliced green onions across the surface adds a fresh green dimension without overwhelming the other colors.
- Sesame oil should be the finishing touch — a few drops drizzled over the top catch the light and create small, glossy beads on the surface of the broth. Do not stir it in; let the diner do that.
- Optional extras for visual appeal: A small mound of menma (fermented bamboo shoots) in one quadrant adds textural contrast and a warm brown color. A pinch of toasted white sesame seeds and a swirl of chili oil add visual complexity and invite the diner to customize.
- Serve with a spoon and chopsticks — Japanese ramen is eaten with both: chopsticks for the noodles and toppings, and a spoon (usually a wide, flat Chinese-style soup spoon) for the broth. Place these to the right of the bowl.
16. SAKE & TEA PAIRING
Japanese ramen is a rich, savory, umami-driven dish that benefits from beverages that cut through fat and refresh the palate between bites rather than competing with the broth's intensity.
Sake Pairings
- Junmai (pure rice sake), slightly chilled: A medium-bodied junmai with savory, rice-forward notes — such as Hakutsuru Sayuri or Kikusui Junmai — complements the creamy pork broth and soy-based tare without overwhelming the dish. Serve slightly chilled (10–13°C / 50–55°F) in a small sake cup (ochoko). The clean finish of junmai cleanses the palate between spoonfuls of rich broth.
- Honjozo (lightly aromatic sake), warmed: A honjozo sake — like Gekkeikan Horin — served at body temperature or gently warmed (40–45°C / 105–115°F) mirrors the warmth of the ramen itself. The gentle warmth and mild fruitiness of honjozo balance the savory depth of the chashu.
- Nigorizake (unfiltered sake), chilled: For a bold pairing, try a nigorizake — a cloudy, slightly fizzy, sweet sake like Hakutsuru Nigori. The sweetness and slight fizz contrast with the salty, savory broth and provide a refreshing counterpoint. Serve well-chilled (5–8°C / 40–45°F).
- Recommended serving: One small flask (180 ml / 6 oz) per person — about two sake cups — is the traditional portion. Sake is not meant to be drunk in large quantities alongside a heavy meal like ramen; the focus should remain on the broth.
Tea Pairings
- Hojicha (roasted green tea): The nutty, toasty, low-caffeine character of hojicha is the classic ramen accompaniment in Japan. The roasted flavor echoes the char on the aromatics in the broth, while its gentle body does not interfere with the soup's complexity. Brew at 95°C / 205°F for 1–2 minutes. Serve hot from a kyusu (Japanese teapot) or in a sturdy cup.
- Genmaicha (green tea with toasted brown rice): The popped rice in genmaicha adds a subtle popcorn-like nuttiness that plays beautifully with the roasted sesame oil drizzle. The light astringency of the green tea base cuts through the pork fat. Brew at 80°C / 175°F for 2 minutes.
- Kombucha (kelp tea), not the fermented drink: Kombu-cha — a simple hot infusion of dried kombu seaweed — is a traditional Japanese table tea that echoes the oceanic umami of the nori garnish. It is salt-tinged and savory, a perfect palate cleanser. Steep a 5 × 5 cm piece of dried kombu in 250 ml boiling water for 5 minutes. Remove the kombu before serving.
- Cold oolong tea: For a refreshing variation, a chilled, unsweetened oolong tea (like a lightly oxidized Taiwanese oolong) provides a clean, slightly floral counterpoint to the rich broth. Serve over ice in a tall glass.
- Avoid: Flavored green teas (jasmine, cherry blossom), heavily sweetened teas, and milky tea preparations (matcha lattes, milk tea). These will clash with the savory profile of the ramen.
17. COMPOSITION NOTES (for the cook)
This recipe is a modular system of five components — broth, tare, chashu, eggs, and noodles — that can be prepared in parallel, then assembled in less than 2 minutes per bowl. Understanding the role of each component and its ratio within the finished bowl is the key to making ramen your own.
Key ratios to remember:
- Broth : Tare = approximately 30 : 1 (by volume) — 500 ml broth to 20 ml tare per bowl. This produces a well-seasoned but not aggressively salty soup.
- Broth : Noodles = about 1.25 : 1 (by volume) — 500 ml broth to approximately 200 g cooked noodles. The noodles should be fully submerged but not swimming.
- Pork bones : Water = 1 : 3 (by weight) — 1 kg bones to 3 litres water. This is the sweet spot for a rich but not gluggy broth.
- Meat : Broth per serving = 100 g chashu to 500 ml broth. Two substantial slices of pork are enough to feel satisfied without overwhelming the soup.
The broth is the heart of the recipe, and its success depends entirely on the emulsification of fat and collagen. The blanching step removes the impurities that would produce off-flavors and gray coloring; the vigorous simmer provides the mechanical agitation needed for emulsification; and the 4–6 hour cooking time ensures enough collagen is extracted from the bones to stabilize the emulsion. If the broth separates into a clear liquid with a layer of fat on top, the simmer was not vigorous enough, the cooking time was too short, or the bones had too little connective tissue.
The tare is deliberately kept simple — soy sauce and mirin. This allows the pure flavor of the pork broth to shine through. In Japan, ramen shops spend years perfecting their tare, often using multiple types of soy sauce and aged mirin. For the home cook, a simple 2 : 1 ratio of soy sauce to mirin is a reliable starting point. To build more complexity, try adding 1 teaspoon of fish sauce (for depth), ½ teaspoon of rice vinegar (for brightness), or a pinch of white pepper (for subtle heat).
Chashu is traditionally made from pork belly, but it can also be made from pork shoulder or even chicken thigh for a lighter bowl. The braising liquid — a mixture of soy, mirin, sake, and sugar — is essentially a nikiri (a Japanese cooking wine mixture). The same liquid, diluted with water, becomes the marinade for the ajitsuke tamago, unifying the flavors of the bowl.
18. JAPANESE CULINARY CONTEXT
Ramen (ラーメン) is Japan's most iconic noodle soup, but its origins are surprisingly Chinese. The dish arrived in Japan through Chinese immigrants in the late 19th and early 20th centuries, particularly in the port cities of Yokohama and Kobe, where Chinese-style wheat noodles in a meat broth — then called shina soba (Chinese noodles) — gained popularity as a cheap, filling street food. After World War II, ramen underwent a distinctly Japanese transformation: returning soldiers who had experienced Chinese noodle soups in Manchuria brought back new techniques, and the post-war wheat shortage in the US occupied Japan made bread scarce but noodles abundant. The first dedicated ramen shop, Rairaiken in Tokyo's Asakusa district (founded 1910 by Taiwanese-Japanese cook Kanichi Ozaki), is credited with popularizing the dish as a Japanese food, adapting the Chinese lamian (pulled noodles) into what we now recognize as ramen.
Modern Japanese ramen has evolved into a hyper-regional cuisine, with every prefecture boasting its own style, broth, noodle thickness, and toppings. The four main categories are:
- Shoyu (soy sauce) ramen: The oldest and most common style, originating in Tokyo. A clear, brown broth (typically chicken or pork based) seasoned with a soy sauce tare. Toppings include chashu, menma, nori, green onions, and a soft-boiled egg.
- Shio (salt) ramen: A lighter, paler broth (often chicken or seafood based) seasoned with a salt-based tare. Popular in Hakodate (Hokkaido), it is the most delicate and subtle of the four styles.
- Miso ramen: A relatively recent invention (1960s, Sapporo-style). A rich, thick broth made with miso paste, often with a pat of butter and corn — adapted from the cold Hokkaido climate.
- Tonkotsu (pork bone) ramen: The style we make in this recipe. Originating in Hakata (Fukuoka, Kyushu), it is characterized by an opaque, milky-white pork broth that has been boiled for hours or even days until the collagen has fully emulsified. The noodles are typically thin and firm, and the toppings are minimal: chashu, green onions, pickled ginger, and sesame seeds.
Ramen occupies a unique position in Japanese food culture: it is simultaneously a humble street food (sold in yatai — mobile food stalls) and a high-art culinary pursuit (with Michelin-starred ramen shops like Tsuta in Tokyo and Nakiryu in Minami-Aoyama). A bowl of ramen is eaten quickly and purposefully — the Japanese phrase ramen wo suu (slurp ramen) emphasizes the sound of drawing up noodles and broth together, which is not only acceptable but encouraged. Slurping aerates the noodles and broth, cooling them slightly while enhancing their flavor.
The toppings in this recipe — chashu (braised pork belly), ajitsuke tamago (marinated soft-boiled egg), nori (dried seaweed), and green onions — represent the classic Hakata-style tonkotsu ramen topping set. Each component serves a purpose: the chashu adds rich, fatty meat; the egg adds creamy richness; the nori adds oceanic umami and textural contrast; and the green onions add freshness and a sharp bite that cuts through the fat.
19. ADAPTATIONS
- Gluten-Free: Replace soy sauce with tamari (or coconut aminos for a soy-free option). Use rice noodles instead of wheat ramen noodles. Confirm mirin is gluten-free (most are, but some brands add wheat-based ingredients). Omit the nori (some brands may contain trace wheat from shared facilities) or find a certified gluten-free brand.
- Dairy-Free: This recipe is naturally dairy-free as written. No modifications needed.
- Lower-Fat: Use a combination of pork bones and chicken wings (1:1 ratio by weight) instead of all pork bones. The chicken wings contribute collagen with less fat. Trim visible fat from the pork belly before braising. Skim the broth after chilling (refrigerate the finished broth overnight, then scrape off the solidified fat layer before reheating).
- Lower-Sodium: Use low-sodium soy sauce (reduced by about 40%) and reduce the tare to 1 tablespoon per bowl. Omit the salt from the broth. Make the chashu with 50% less soy sauce. The flavor will be noticeably milder but still satisfying.
- Pork-Free (Chicken Ramen): Replace pork bones with 1 kg chicken backs and necks, and 500 g chicken feet (for collagen). Replace pork belly with boneless, skin-on chicken thighs (same braising liquid, 45 minutes braising time). The broth will be lighter in color and body but still deeply flavorful. Add 2 teaspoons of white sesame paste (tahini) at the end for body.
- Halal/Kosher Version: Use beef bones (femur or neck) for the broth and beef brisket or lamb shoulder for the chashu. Replace mirin with a non-alcoholic sweetener (1 tablespoon sake substitute + 1 teaspoon sugar; sake substitute can be non-alcoholic or replaced with white grape juice). Use halal-certified soy sauce or coconut aminos.
- Pescatarian Version: Replace pork bones with a combination of kombu (dried kelp), dried shiitake mushrooms, and bonito flakes (katsuobushi). Simmer for only 1 hour (no vigorous boiling is needed — kombu and bonito become bitter with prolonged heat). Use pan-seared salmon or grilled eel (unagi) instead of chashu.
- Extra-Vegetable Ramen: Add a handful of fresh bean sprouts to each bowl just before serving (blanch them in the noodle water for 30 seconds first). Add a small mound of menma (fermented bamboo shoots) and a spoonful of sweet corn (for a Sapporo-style miso ramen twist). Spinach blanched in the noodle water for 15 seconds and squeezed dry is another excellent addition.
- Large Batch (8–10 servings): Double all ingredients. Use a stockpot of at least 16 litres / 16 quarts capacity for the broth. Braise the chashu in a larger pot or in two batches. Cook noodles in batches (do not crowd the pot — cook 2 portions at a time in at least 5 litres of water). Assemble bowls in groups of 4, working quickly to maintain the broth temperature. The broth can be made up to 3 days in advance.
- Quick Ramen (2-hour version): Use 500 g chicken backs instead of pork bones (chicken broth develops flavor faster), and pressure-cook the bones in an instant pot at high pressure for 90 minutes. Use pork shoulder instead of belly for the chashu (45 minutes braising). Cook the eggs in the same pot after the pork is done. The result is a respectable approximation that tastes like it simmered all day — but only if you have a pressure cooker.
Meshi agare! (Enjoy your meal! — said to a group in Japanese)
Position: Recipe 363 of 03_cookbook, Volume 1
Recipe from The Italian Kitchen by Vita Milanese — Volume 1 · Pasta Perfetto. Discover all volumes on the ebook page.